Reference
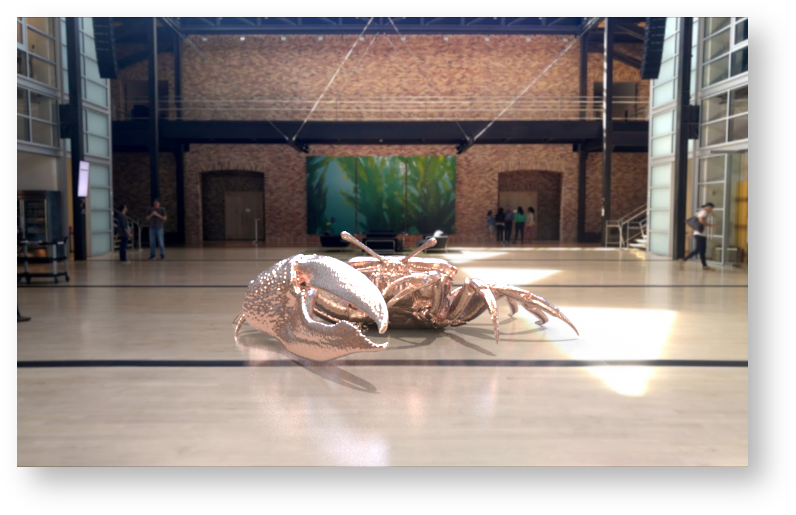
Rendering in Blender
Integrators in Blender
Integrators take the camera rays and return results to the renderer. For the main integrators these are estimates of the light energy (radiance) from the surfaces seen from the outside along the rays. These main integrators are responsible for computing the overall light transport, that is, light that travels from a light source through your scene from object to object (or through objects and volumes) to reach the camera. Interior integrators assist in specialized cases by handling the light within surfaces or volumes. We provide three main production quality integrators, though users can substitute their own.
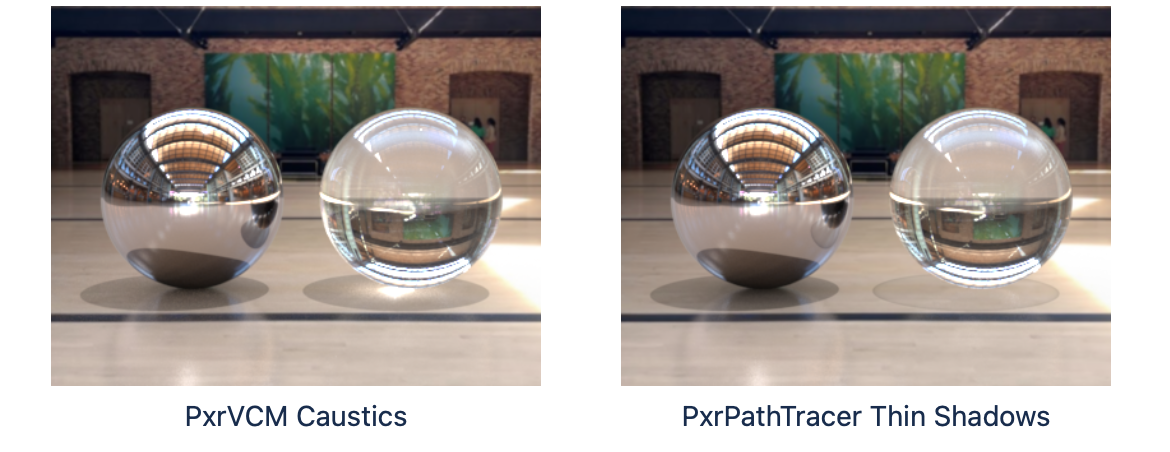
PxrPathTracer implements a unidirectional path tracer. This combines information from the materials at the hit points with light samples to estimate direct lighting and shadowing, then spawns/shoots additional rays to handle indirect lighting. This works well with environment lights, and large direct light sources. Typically exterior scenes, scenes lit by dome lights/HDRI, and many typical visual effects shots are rendered with this integrator.
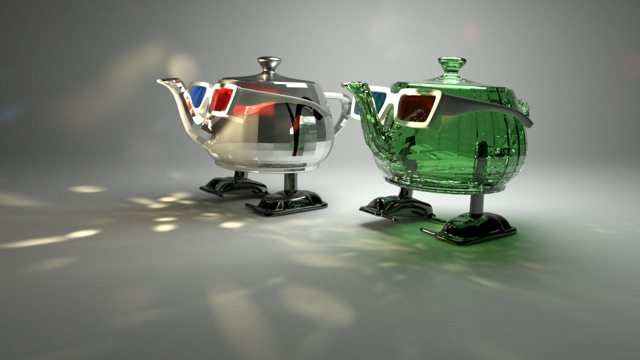
PxrVCM extends this with bidirectional path tracing. In addition to the paths from the camera, it traces paths from the light sources and tries to connect them. It can resolve complicated indirect paths that may be slow to converge with PxrPathTracer. In particular, it is designed to handle specular caustics. Caustics are an effect of light being refocused after reflecting or refracting off a surface. The above image illustrates both of these effects. If your scene requires these effects or you have complex lighting where some lights may be covered or hidden in fixtures, then the PxrVCM integrator is your most likely efficient choice.
PxrUnified is available but currently experimental until it supports all the features of commercial RenderMan.
Setting Integrators in Blender
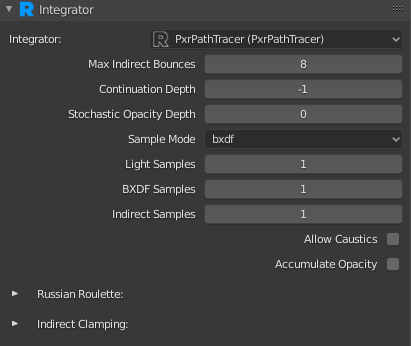
By default, RenderMan for Blender will use PxrPathTracer as the integrator for the scene. To set/use a different integrator, go to the render properties and click Add RenderMan Integrator Nodetree.

You should then see something like this:
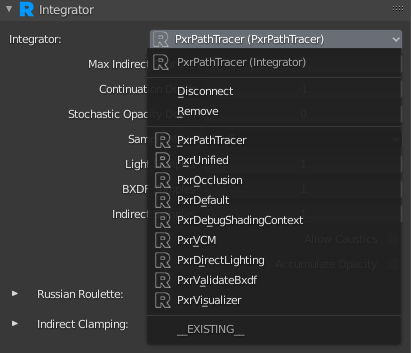
You can select a different integrator by using the drop down menu.
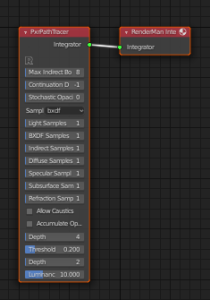
Note, integrators in Blender are just shading nodes in the world node’s shading graph. If you look at shading nodes for the world node in shader editor you should see something like this:
Sample and Display Filters in Blender
Sample and display filter plug-ins are used to adjust shaded sample and pixel values, respectively, after an integrator has produced them and before they are sent to the display driver.
Sample Filters
Sample Filter plug-ins describe color transformations made to sample values before they are pixel filtered. They operate on the raw camera ray samples before pixel filtering is applied to them. Once a sample filter changes a sample and it goes into the framebuffer it becomes a permanent part of any rendered images (including deep images). Note that if a single arbitrary output variable (AOV) is output as part of multiple image files, a single change to a sample may affect all of them. Changes made by a sample filter can also influence the adaptive sampler.
Display Filters
Display Filter plug-ins describe color transformations made to final pixel values after pixel filtering and before they are output. AOVs shared by multiple images are considered distinct at this point and can be modified separately. Display filters are not currently supported for deep images at this time and have no effect on the adaptive sampler.
Setup in Blender
You can create Display and Sample Filters in the render properties . Click the Add RenderMan Display Filters Nodetree button or Add RenderMan Sample Filters Nodetree.
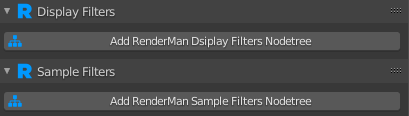
You should see the panels for Display Filters and Sample Filters expand similar to below.
Clicking Add RenderMan Display Filters Nodetree will automatically add a PxrBackgroundDisplayFilter node and inherit the World color as the background color.
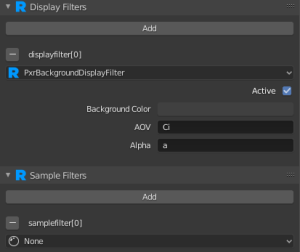
Multiple Display and Sample Filters can be used. Clicking Add will add a new slot for an additional Display Filter or Sample Filter that can be added. To remove a filter, click the - button next to the name. Like integrators, display and sample filters are just shading nodes inside of the world node.

AOVs in Blender
Arbitrary Output Variables (AOVs) are the secondary images produced by the renderer. There can be any number of them generated simultaneously and each one may go to a different file, a different display driver, or use different pixel filter settings. In some cases, special pixel filter modes may be used to avoid mixing values from different samples in a non-sensical way; typically these select a single sample to be representative of the whole pixel.
Broadly speaking, AOVs in RIS fall into these main categories: built-in, integrator (global), custom, and light path expressions.
AOVs Manager
By default, RenderMan for Blender will attempt to translate the default outputs that come with Blender. If you click on the view layer properties , the UI should more or less look familiar to veteran users.
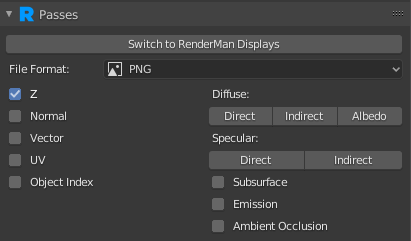
However, we can switch over to using RendeMan for Blender’s AOVs manager by clicking on “Switch to RenderMan Displays”. After clicking the button, the UI should look something like this:
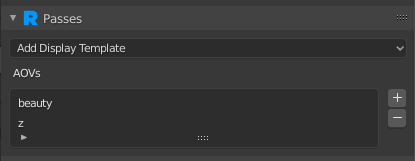
The button will also attempt to create the equivalent AOVs from the outputs selected from the previous UI. Each item under the AOVs list is a single output with a number of channels. Selecting an item from the list will display the file format options for that AOV along with the channels.
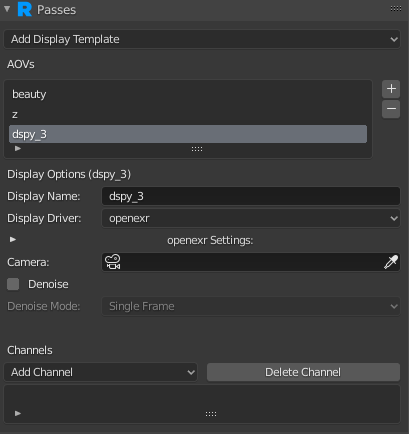
Here we can see dspy_3 will output to OpenEXR. Opening the openexr Settings section will show the options for the OpenEXR display driver, such as compression and the type (float or half float). Camera allows you to render the AOV from a different camera than the main scene camera. The Denoise option will tell RenderMan to denoise the AOV during external/batch rendering.
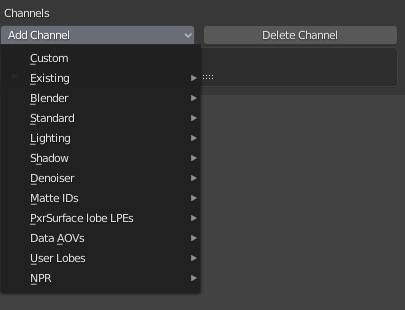
To add channels to the AOV, use the Add Channel drop down menu.
You can remove a channel from an AOV by clicking on Delete Channel. Selecting a channel will also present a list of options that modify the behavior of the channel. It also shows the type and the source.
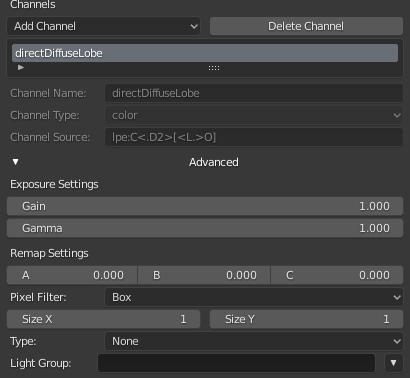
You can also create your own custom channel by clicking on Custom from the Add Channel dropdown. It is then up to you to give the channel a name, the type, and the source (Light Path Expression).
Render Holdouts in Blender
To enable holdouts, first select the object you want to holdout, and in the object properties , set Hold-Out to Yes:

Next, in the render properties , change Render Holdouts to either In Alpha or Separate AOV.
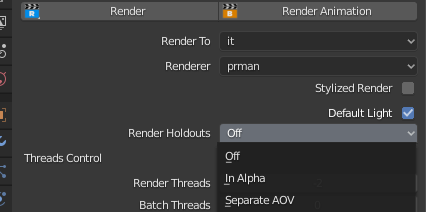
Selecting Alpha will put the holdout into the alpha of the beauty image, Separate AOV will output a separate image.
About Holdouts
VFX artists often need to composite the CG objects over a live action film plate. To convince the audience that the CG objects are real and belong to the scene, holdouts are used to collect the CG objects’ shadow and reflection that match very closely to the shadow and reflection in the live action plate.
Geometry
Holdout objects are used in place of real world object to catch light interactions from 3D objects. In RenderMan, holdout objects are specified by enabling the trace holdout attribute.
Attribute “trace” “int holdout” [1]
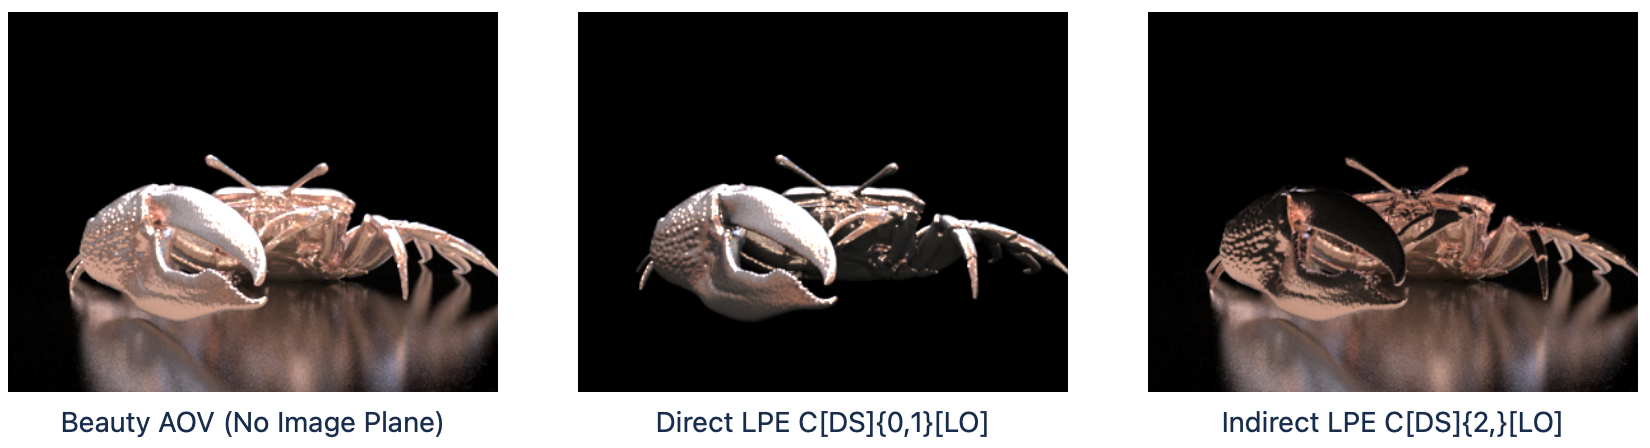
Integrators and AOVs
Holdouts are an illumination feature implemented at the integrator level. They are able to catch a variety of integrator-specific illumination effects such as diffuse and specular reflections, transmissions, and caustics. Available integrator that support holdouts are: PxrPathTracer, PxrVCM, and PxrUPBP.
LPE workflow remains unchanged for holdout geometry.
Because holdouts workflow involves multiple AOVs, rendering with adapt all enabled can reduce noise.
Lights
By default, light sources are considered holdouts and do not illuminate other holdout objects directly. This prevents double contribution between lights used to illuminate non-holdout geometry and the illumination already captured on the plate image.
To create a light source that does directly illuminate holdout objects, use “__illumholdout” as the light group suffix. This tells integrator plug-ins to consider this light as a non-holdout light source when determining illumination.
Light “PxrSphereLight” “spherelight” “string lightGroup” [“light__illumholdout”]
Alpha, Shadows, and Compositing
Holdout contribution can be composited over a film plate using an alpha and shadow pass as masks. The shadow pass is generated using the PxrShadowDisplayFilter plug-in and can be optionally written to its own AOV or added to the alpha. The occluded and unoccluded input AOVs should be rendered using the holdouts LPE prefix so that they only contain the shadowing term for holdout geometry.
DisplayChannel "color shadow"
DisplayChannel "color occluded" "string source" ["color lpe:holdouts;C[DS]+[LO]"]
DisplayChannel "color unoccluded" "string source" ["color lpe:holdouts;unoccluded;C[DS]+[LO]"]
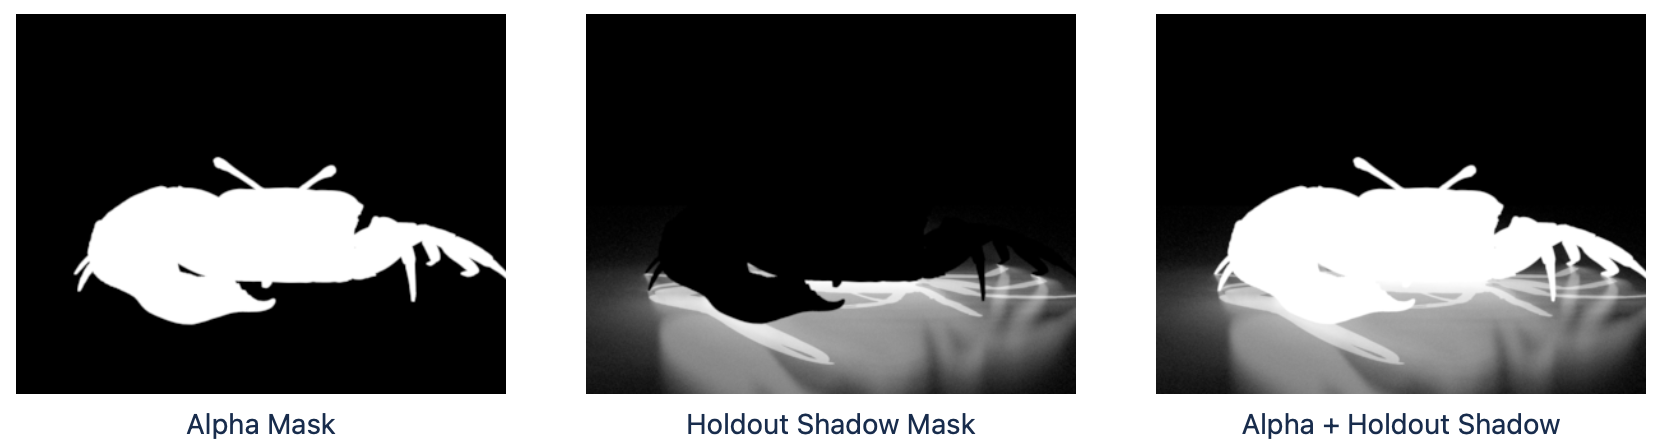
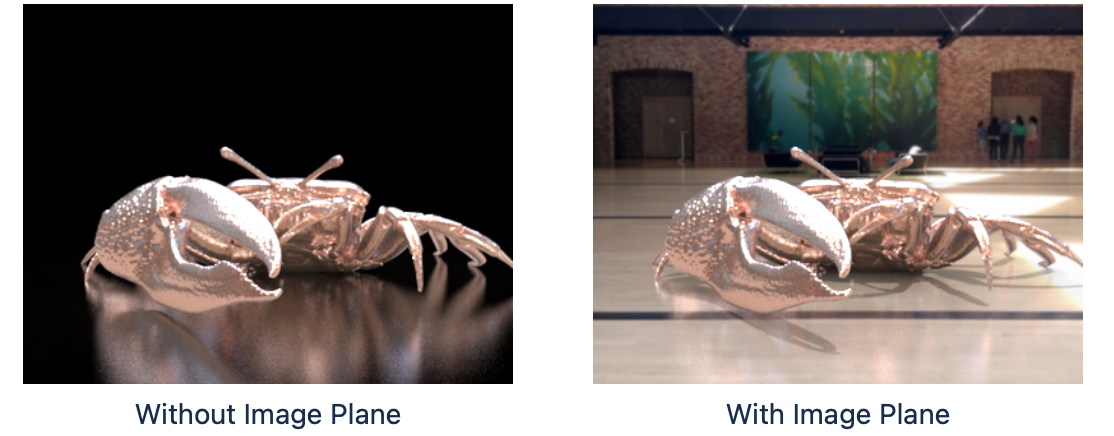
Compositing can be interactively previewed in RenderMan by using the PxrImageDisplayFilter plug-in. This will composite the film plate with the beauty channel, using the alpha channel and holdout shadow AOV to mask the plate.
Batch Rendering in Blender
Batch rendering with RenderMan for Blender can be done from the External Rendering panel, in the render properties. Let’s take a look at some of the options available.
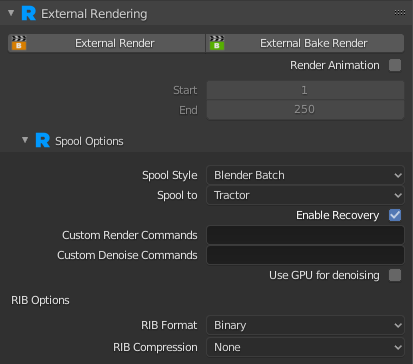
External Render: Starts and spools a batch render job
External Batch Render: Starts and spools a bake render job
Render Animation: Whether you want to render a full animation (i.e.: multiple frames). The frame range should be set with the Start and End settings.
Spool Style: Select between Blender Batch or RIB. Blender Batch will spawn a separate blender process to render. For RIB, RenderMan for Blender will write out to external RIB files to disk first before rendering (Blender is not involved with rendering). Each mode has advantages and disadvantages.
Spool To: Choose between Local Queue or Tractor. Local Queue is our local render queue manager; all renders are done on the local machine. Tractor is our render farm job queue and work distribution system. This choice requires that you have Tractor installed on your local machine, as well as a Tractor Engine and Tractor blades installed on your local network.
Enable Recovery: Whether you want to attempt a recovery render. For more information see Checkpointing and Recovery. The checkpoint setting can be found under the Sampling panel.
Custom Render Commands: Allows you to add any other arguments you want to add to the render command
Custom Denoise Commands: Allows you to add any other arguments you want to add to the denoise command
Use GPU for denoising: Whether or not the denoiser should use the GPU for denoising.
RIB Format: If Spool Style is set to RIB, this controls whether RIB is written as ASCII or Binary formats. Binary can save on disk space, but cannot be inspected with a text editor.
RIB Compression: If Spool Style is set to RIB, this controls whether or not you want to also GZip the RIB files, to save additional disk space.
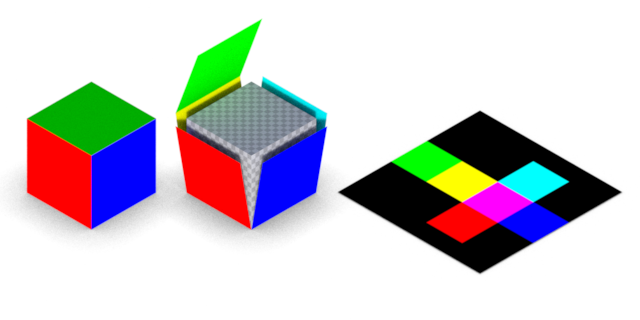
Baking in Blender
Overview
Baking allows users to pre-compute or “bake” pattern networks into 2D texture images or 3D point clouds. Baking has several advantages:
-
Reduce render times be eliminating run-time computation of expensive pattern networks. These savings can be realized across many frames.
-
Look development asset publishing as part of a shading pipeline.
-
Lock procedural pattern information from a reference position without using Pref
-
Transfer assets between renderers, real-time viewports, and 3D printing.
Baking is exposed in RenderMan via pass-through pattern plug-ins that allow users to both render and bake from the same scenes. Without heavy modification of assets or scenes, users are able to:
-
Use previously baked results, if they exist, or
-
Read the pattern network instead of the baked results. This can happen for any reason but typically will because the baked results do not exist or a user wishes to ignore the baked result in order to tweak the pattern network.
Baking itself is enabled by using the bake hider.
Texture Baking
2D baking allows users to bake pattern signals to texture images. Users can bake directly to txmake (.tex), TIFF (.tif), and OpenEXR (.exr) outputs. 2D baking requires users to supply a well formed texture manifold, meaning there should be user created UVs laid out appropriately for their needs. While the most common texture manifold is ST, arbitrary manifolds are supported. Atlas outputs such as UDIM are supported.
RenderMan provides a generic texture baking pattern, PxrBakeTexture
Point Cloud Baking
RenderMan provides a generic point cloud baking pattern, PxrBakePointCloud. This can be used to generate Ptex images.
Blender Setup
Baking can be set up in the render properties , under the Baking panel.
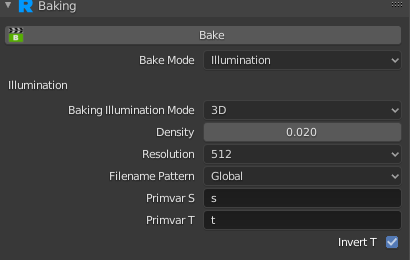
Bake: This will start a single frame bake render. If you want to do multiple frames, or want to do a batch render, use the External Bake Render button
Bake Mode: Choose between Pattern, Illumination, or All. For Pattern, this requires either a PxrBakeTexture or PxrBakePointCloud somewhere in your object’s material shader network. For Illumination, each of your AOVs will be baked into a pointcloud (.ptc) file or a 2D texture file. Selecting All will bake both patterns and illumination.