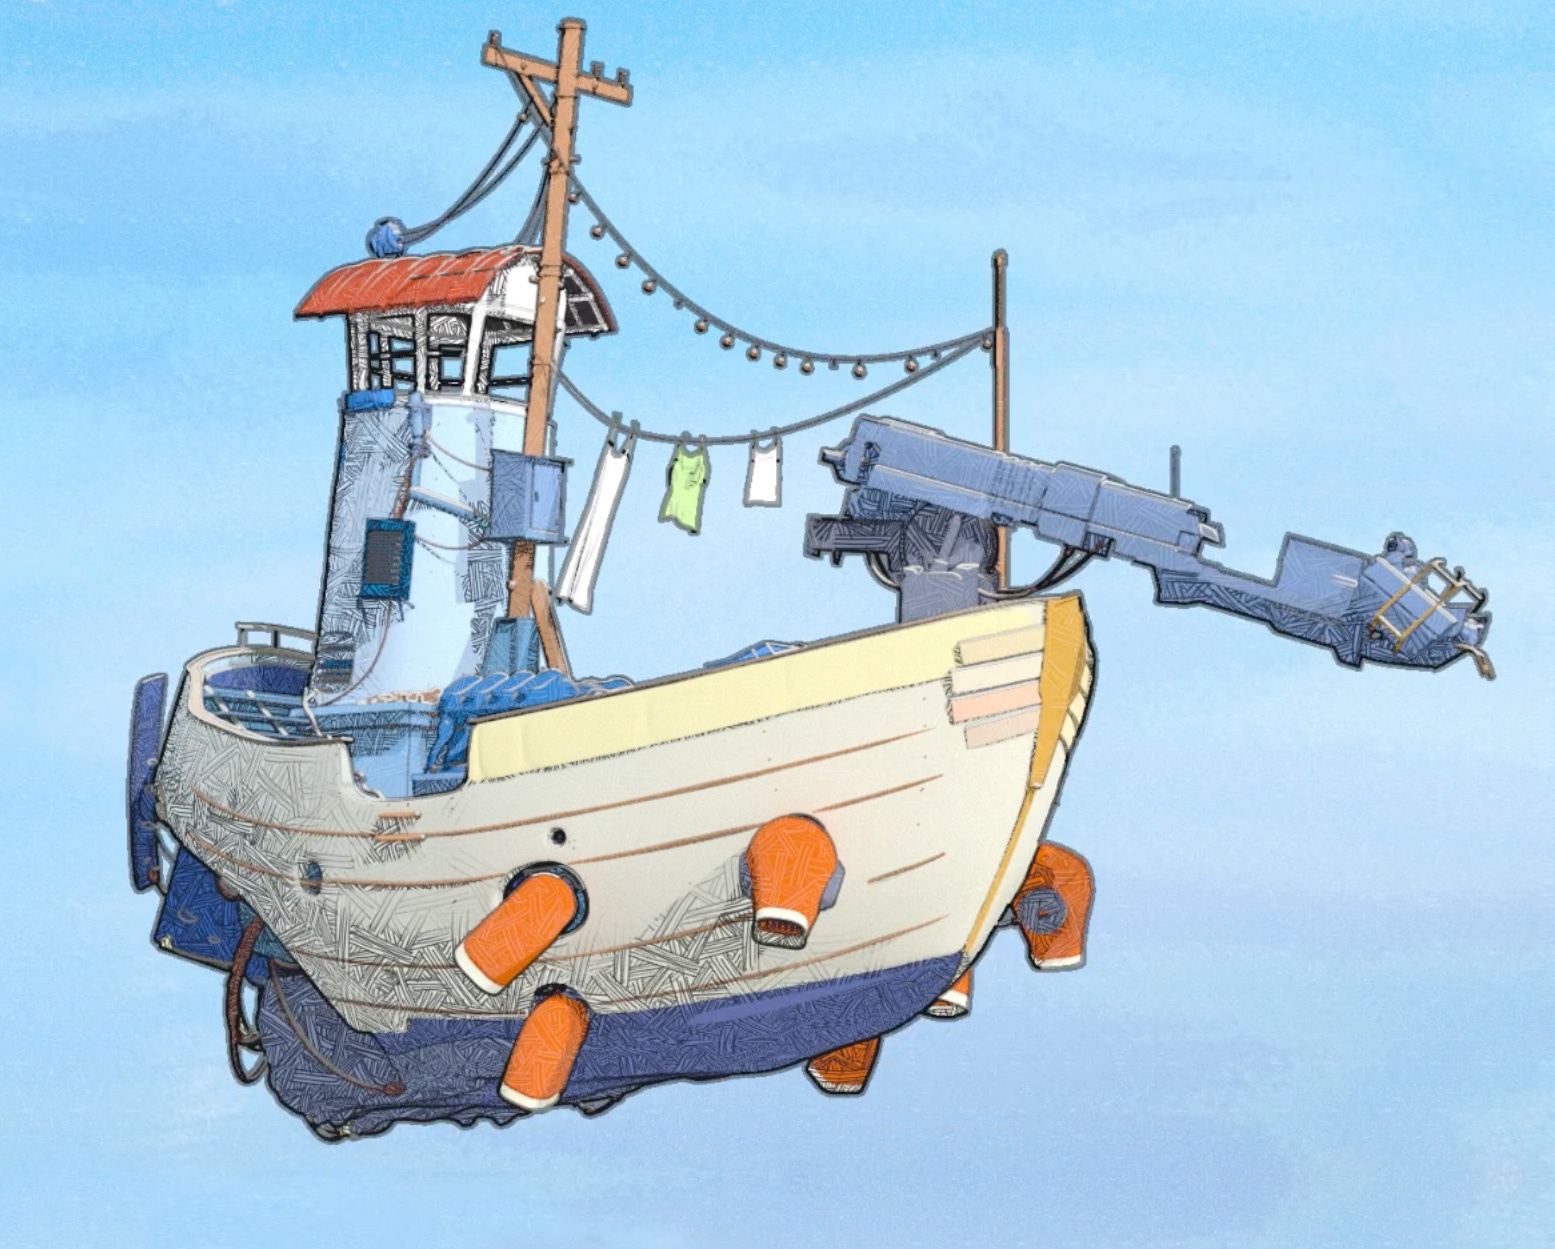
Reference
Stylized Rendering
Stylized Shipshape was created by Ernst Janssen Groesbeek of 9 to 3 Animation. Ship concept by Ian McQue. Robot concept by Ruslan Safarov. Models by Cheyenne Chapel, Aliya Chen, Damian Kwiatkowski, Alyssa Minko, Anthony Muscarella, and Miguel Zozaya
© Disney/Pixar - RenderMan “Shipshape” Art Challenge
Stylized Looks in Blender
To get up and rendering with Stylized Looks in Blender is very straightforward and only requires a few simple steps.
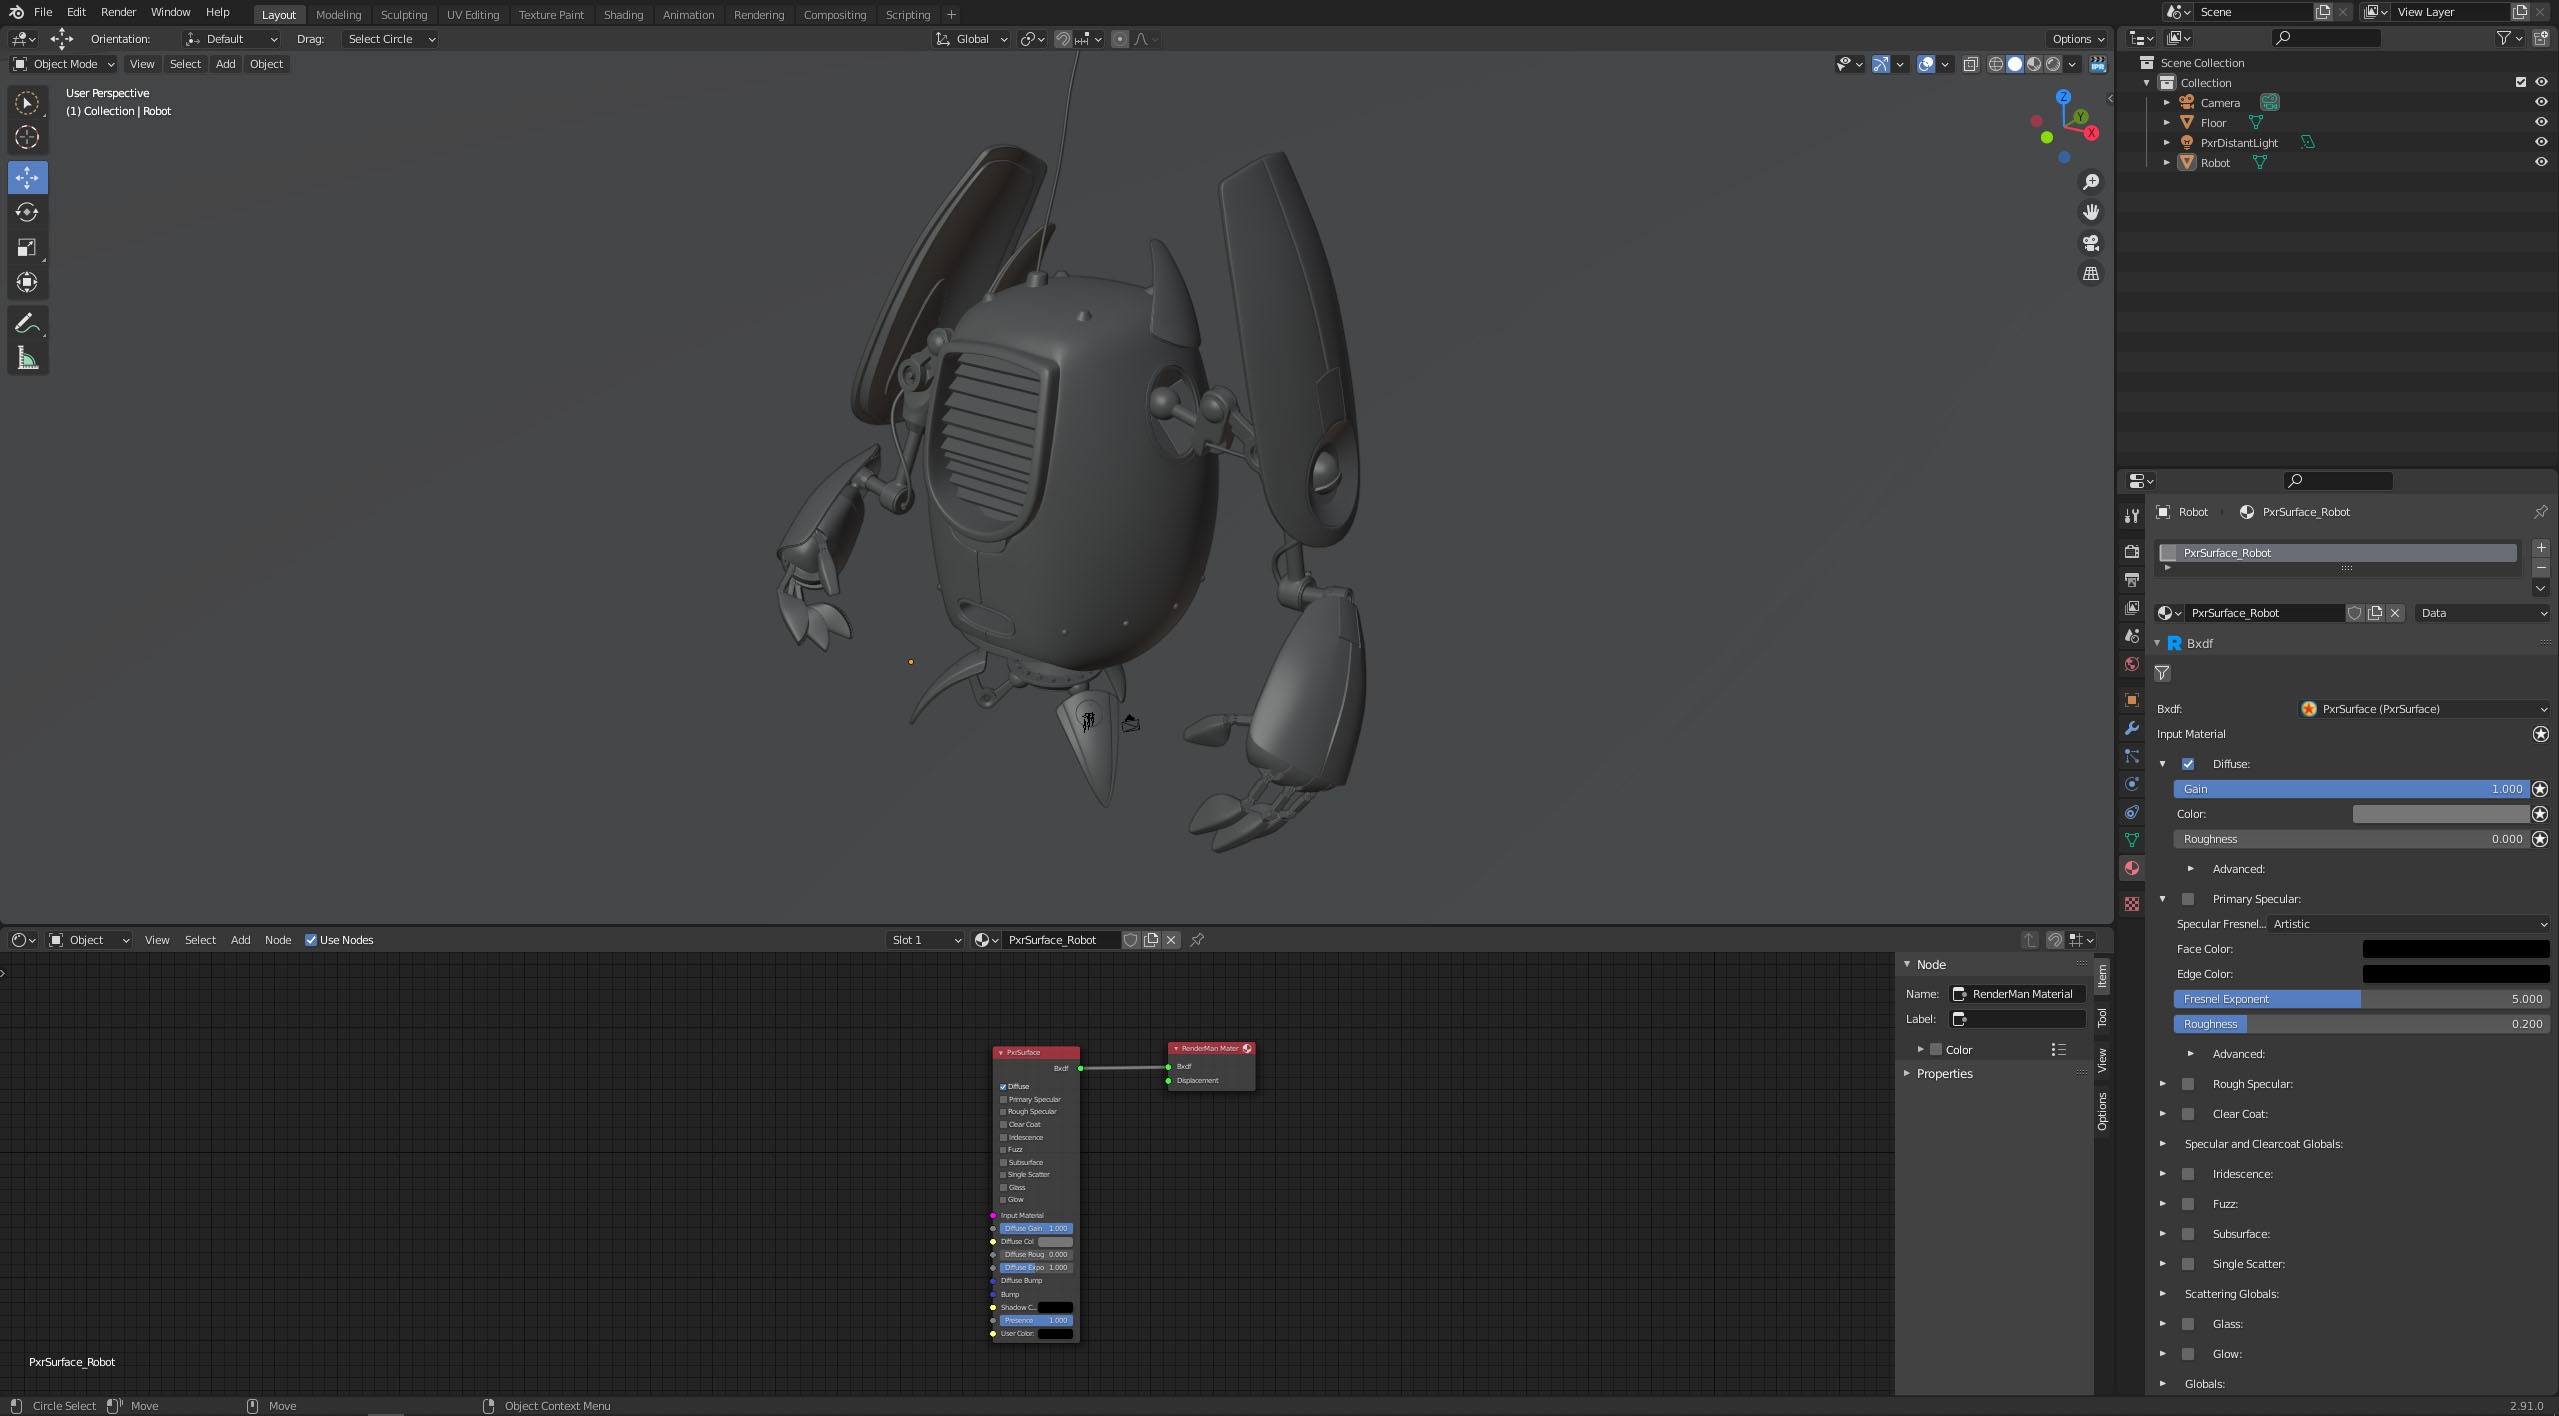 Make sure you add a light to your scene and attach a RenderMan material to your objects before rendering with Stylized Looks.
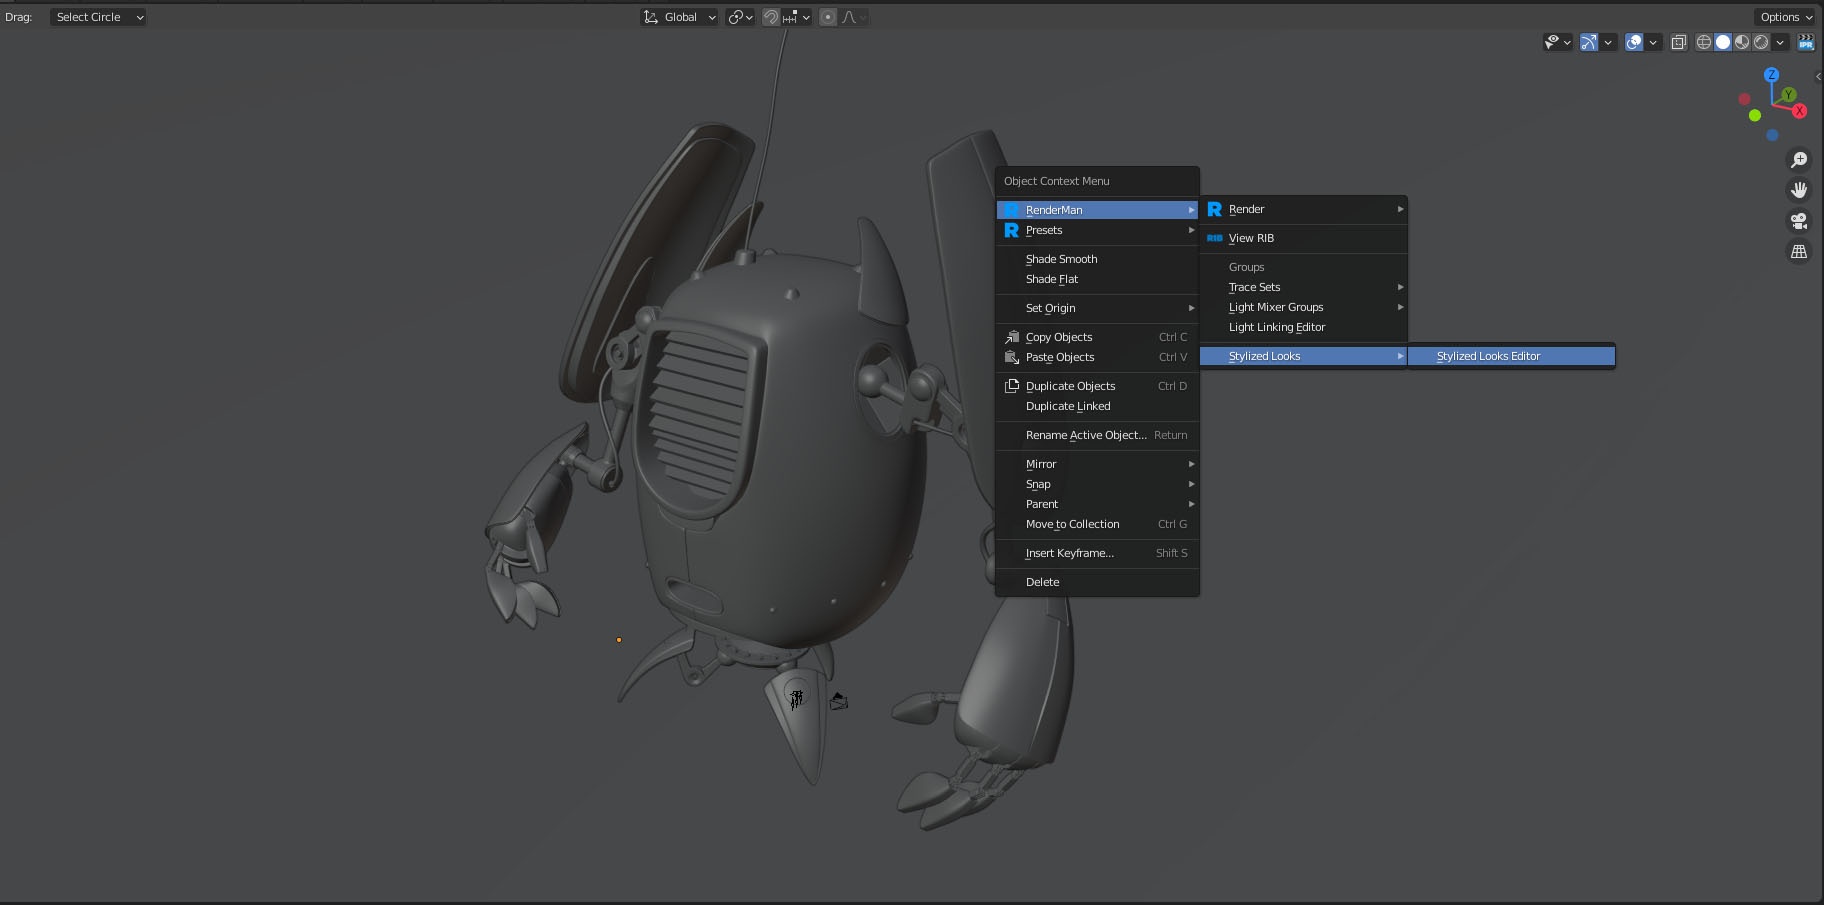
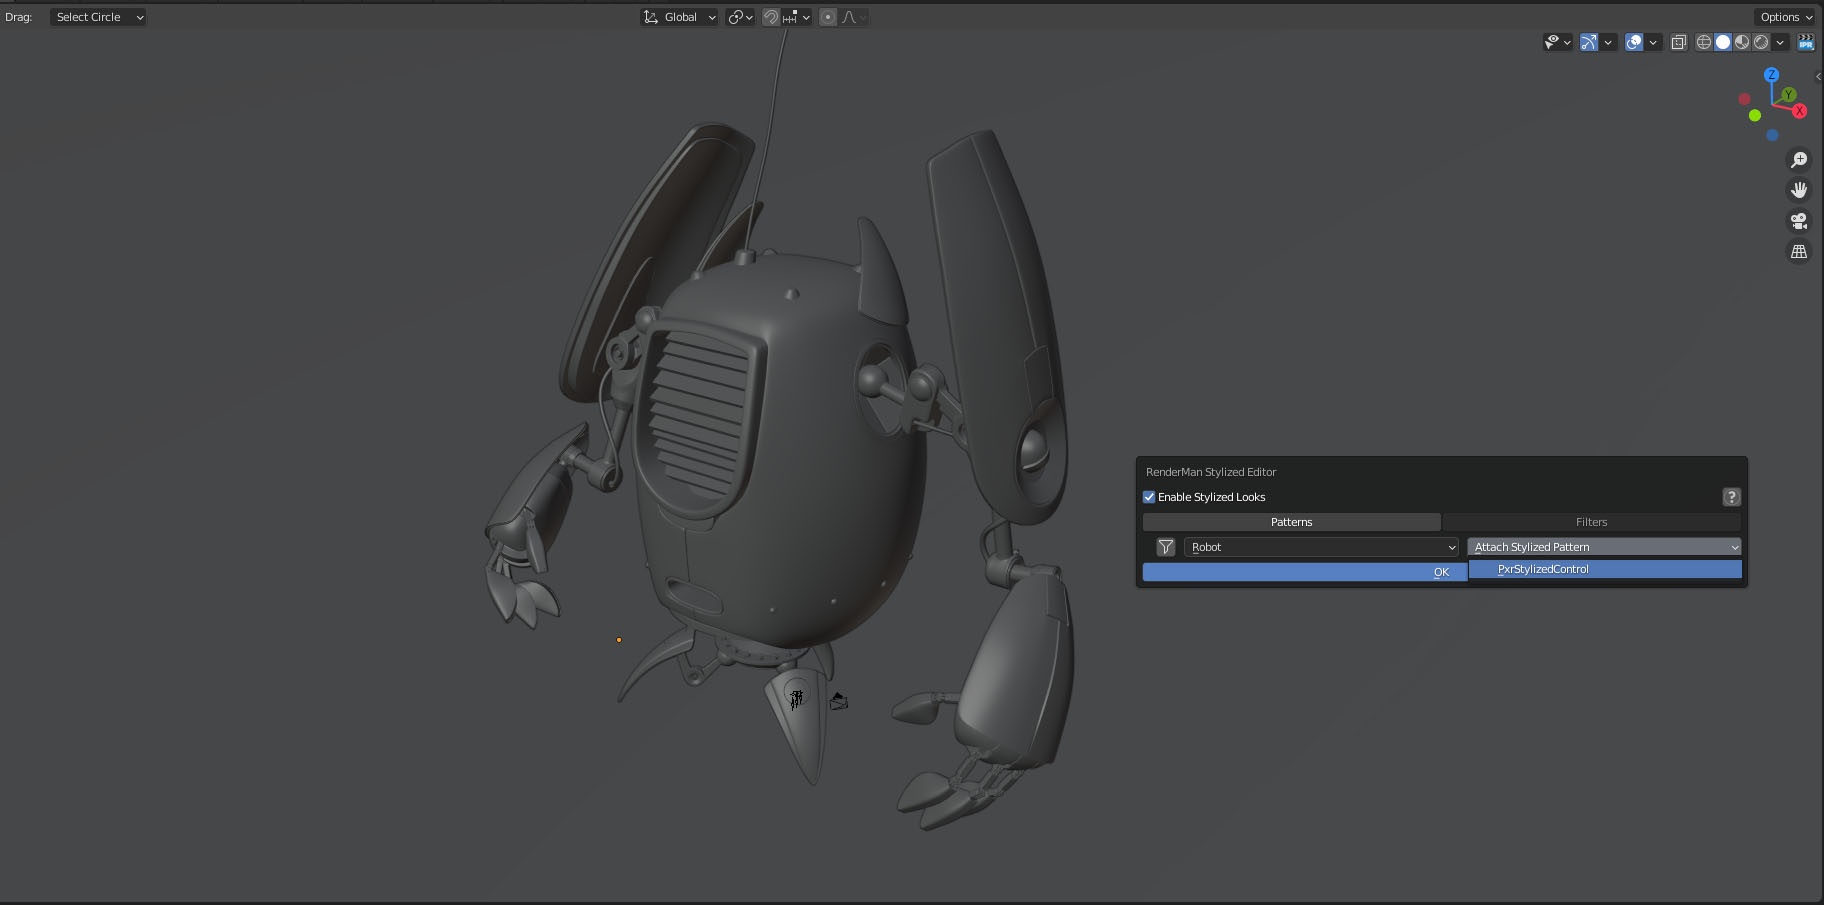
- Right-click in the viewport and select RenderMan → Stylized Looks → Stylized Looks Editor
- Enable Stylized Looks, select an object, and then select a PxrStylizedControl from Attach Stylized Pattern.
Pressing OK will now create and attach the required PxrStylizedControl nodes to the PxrSurface of the robot model.
The PxrStylizedControl network is required to be attached to every object in your scene and allows for individual shading control of each object.
This can also be achieved by selecting an object and RenderMan → Stylized Looks → Attach Stylized Pattern → PxrStylizedControl
- Using the RenderMan Stylized Editor, you can now begin to add in Stylized Filters to begin creating your unique Stylized Look.
In this example, we’ll add in a PxrStylizedHatching Filter
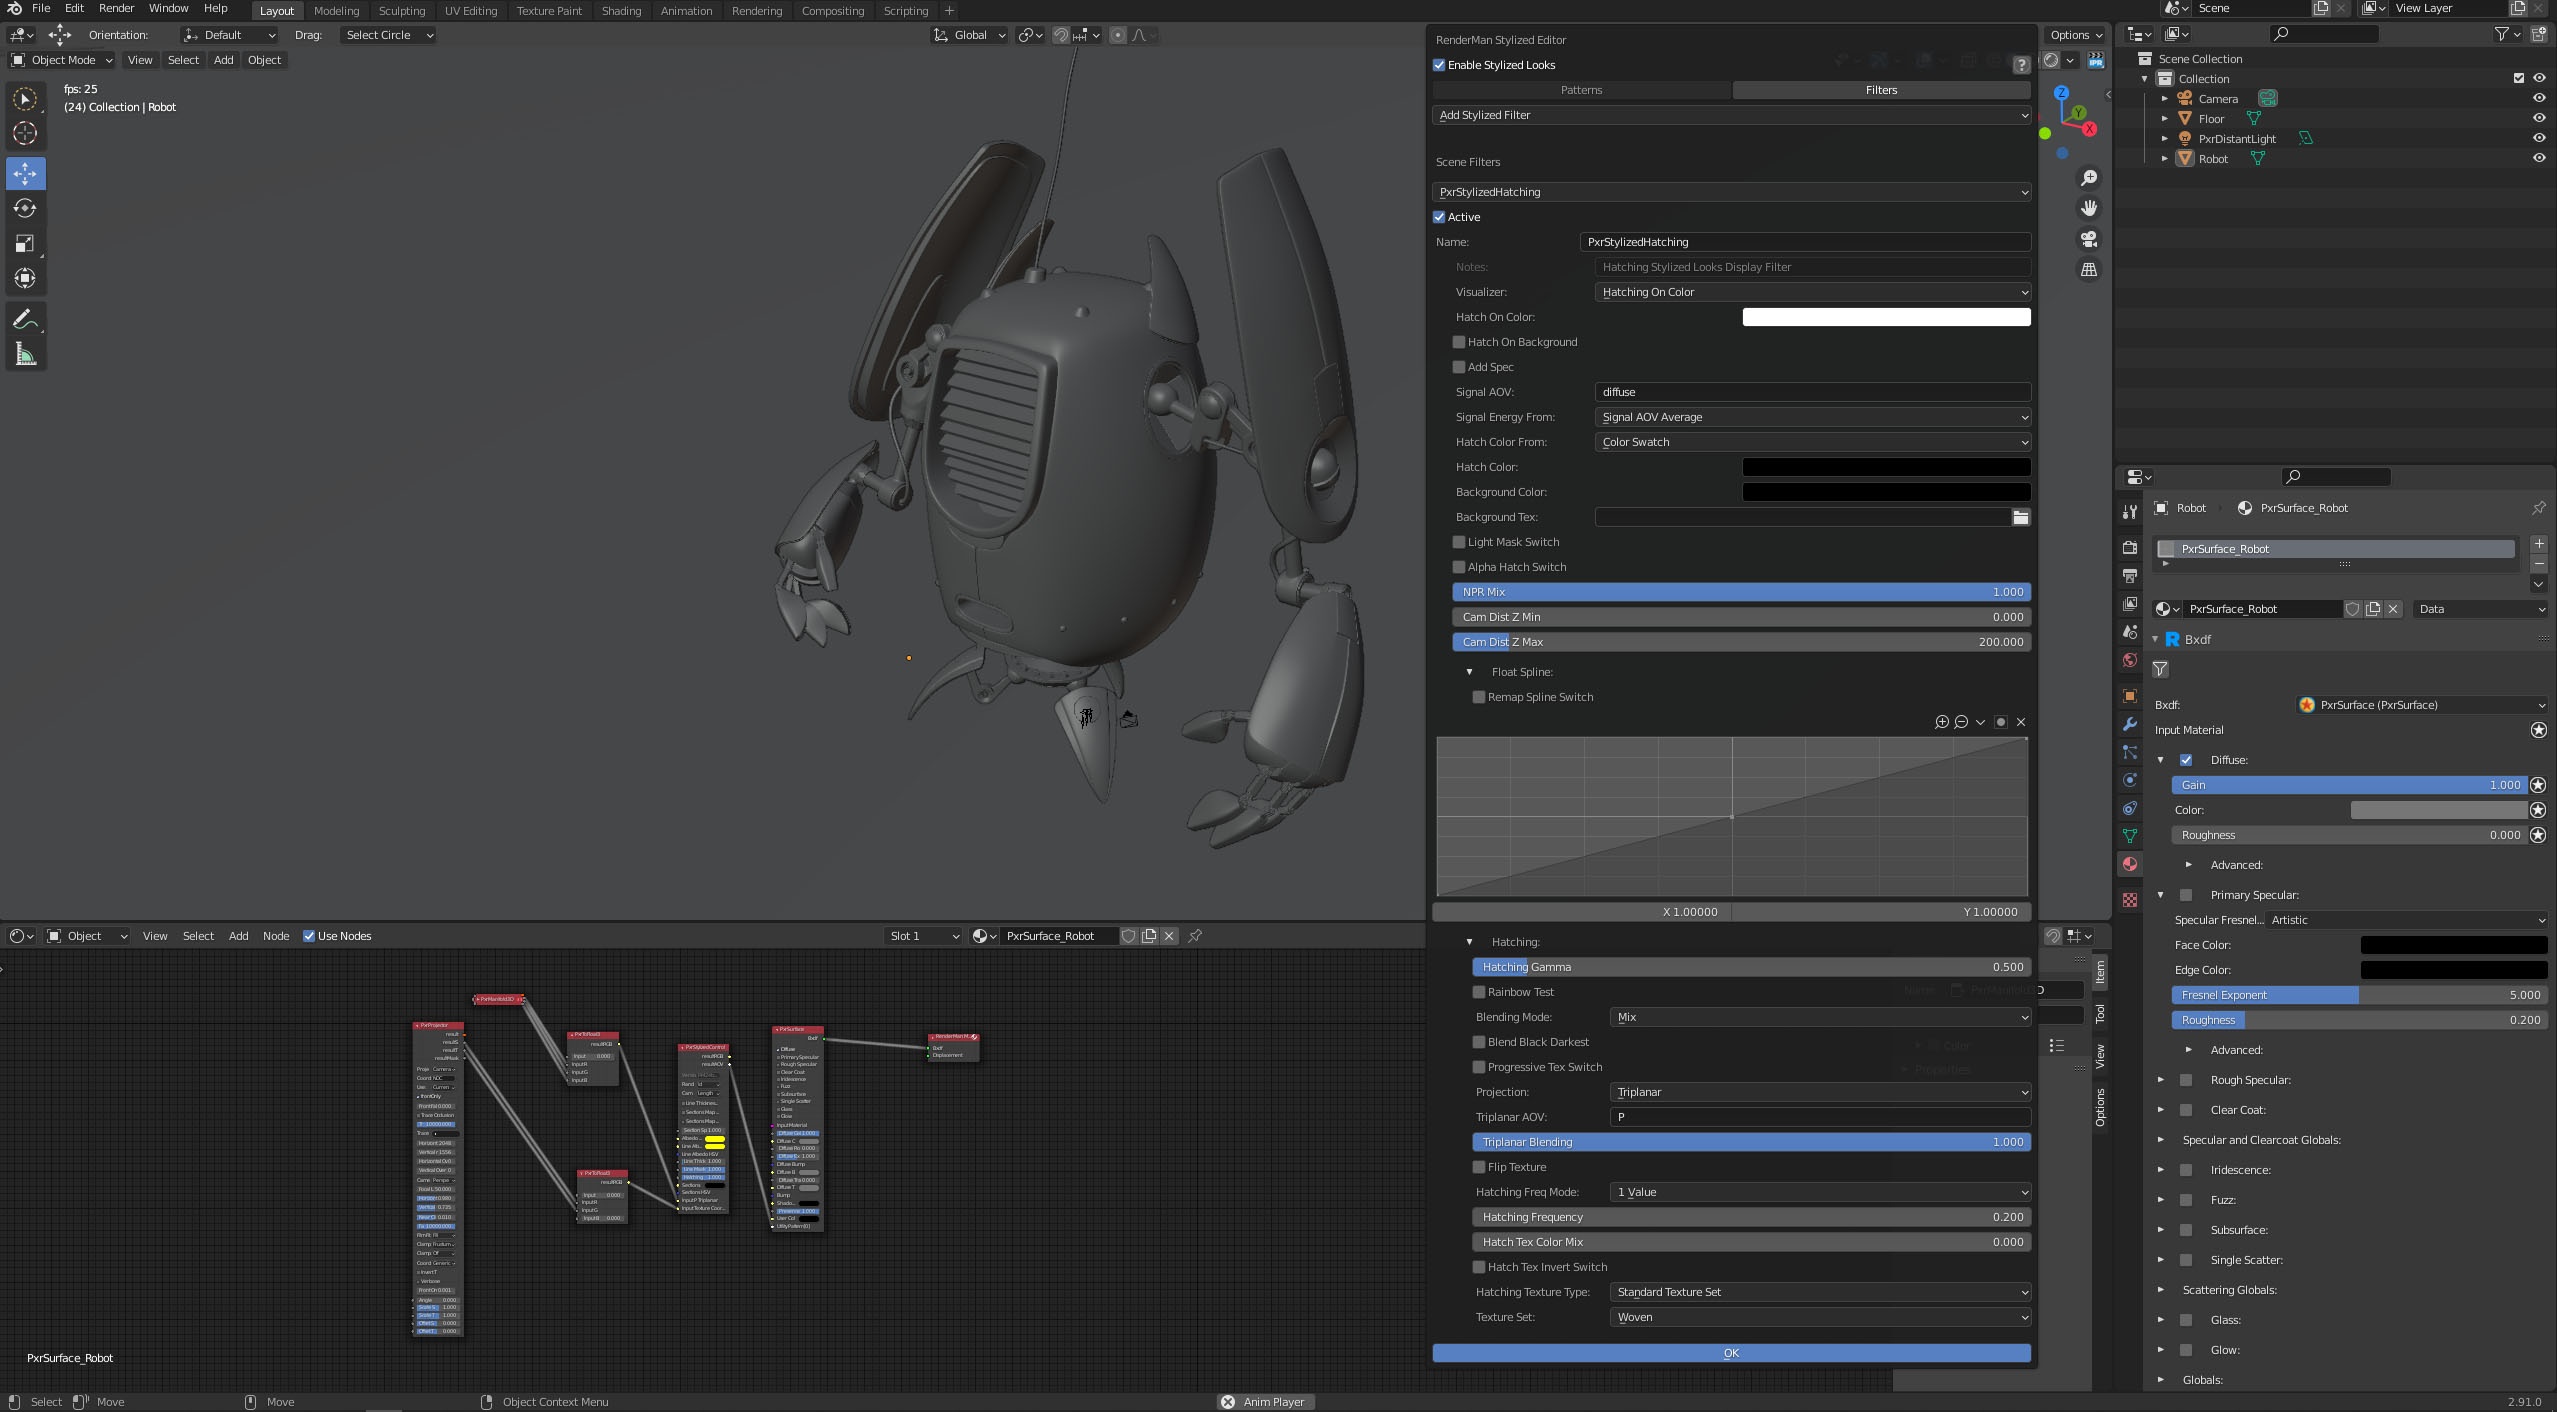
- Now, fire up the IPR, and your scene will now be rendering in Stylized Looks
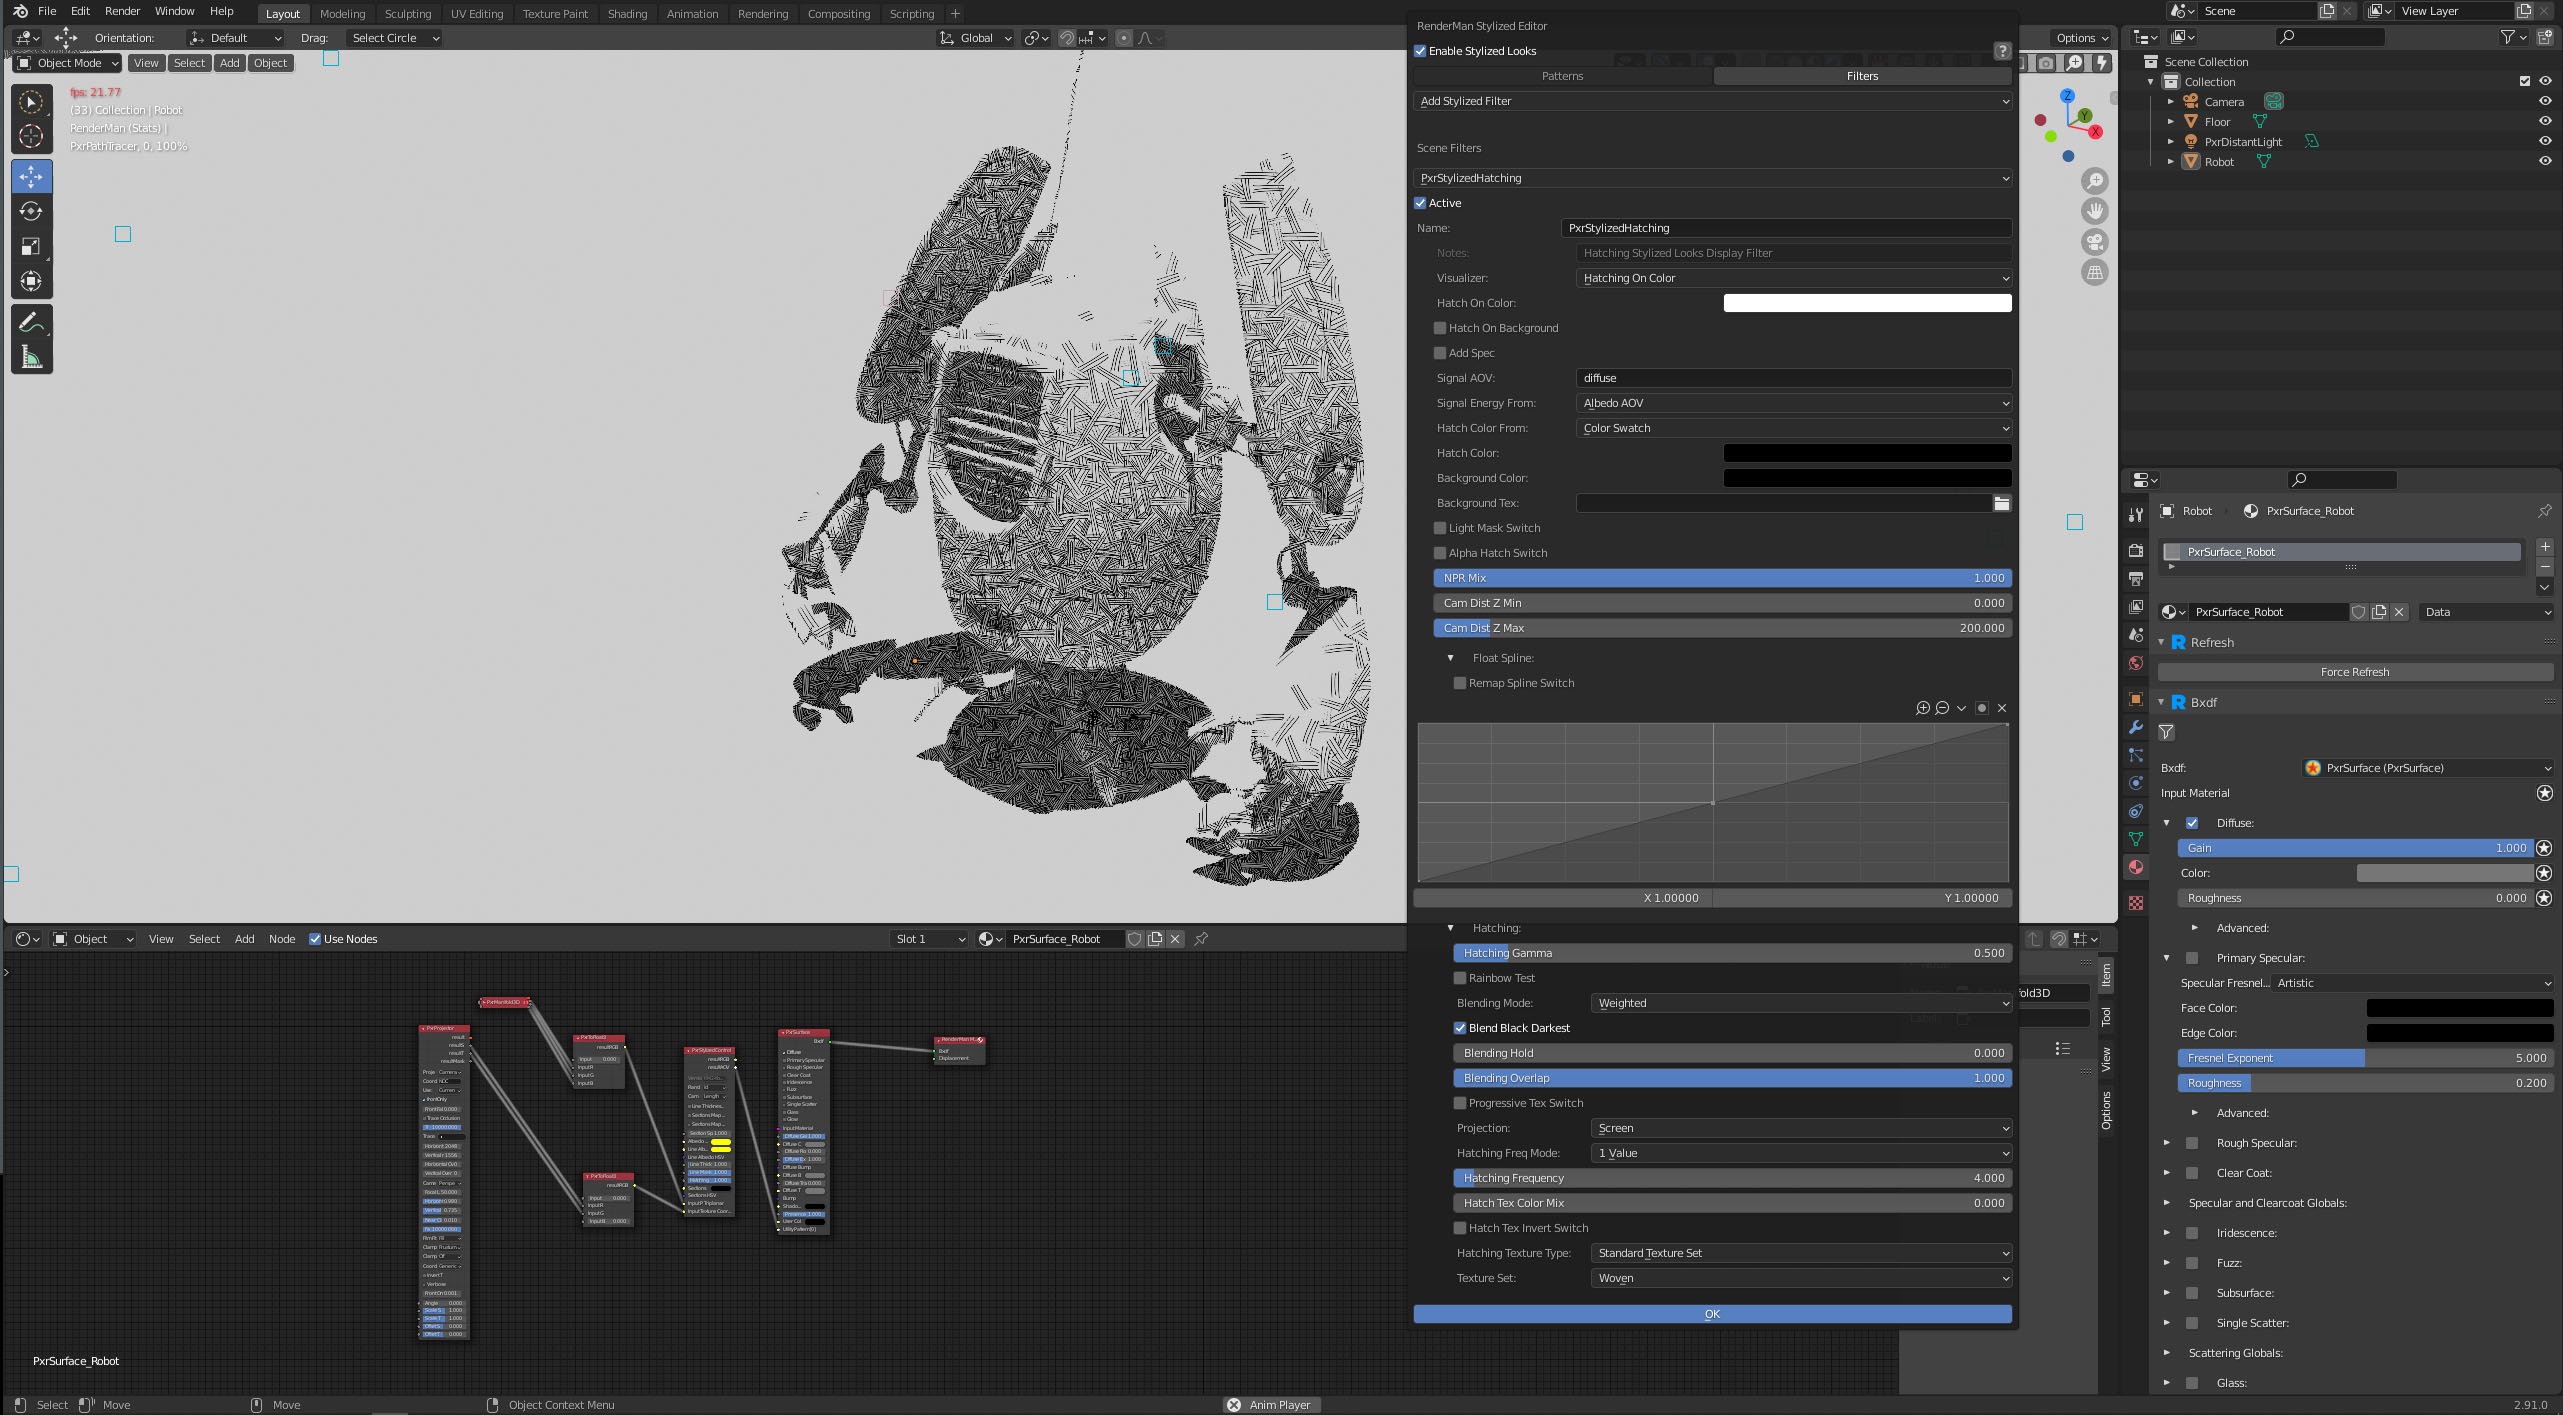
Note: In this example, the default settings have been tweaked in the following :
a) Signal Energy From: Albedo AOV
b) Blending Mode: Weighted
c) Blend Black Darkest: ON
d) Projection: Screen
e) Hatching Frequency: 4
You are now up and rendering with Stylized Looks!
Your creative adventure into NPR has started and don’t forget that the power of Stylized Looks comes when you begin to combine a variety of Stylized Filters together to create your own unique styles and looks.
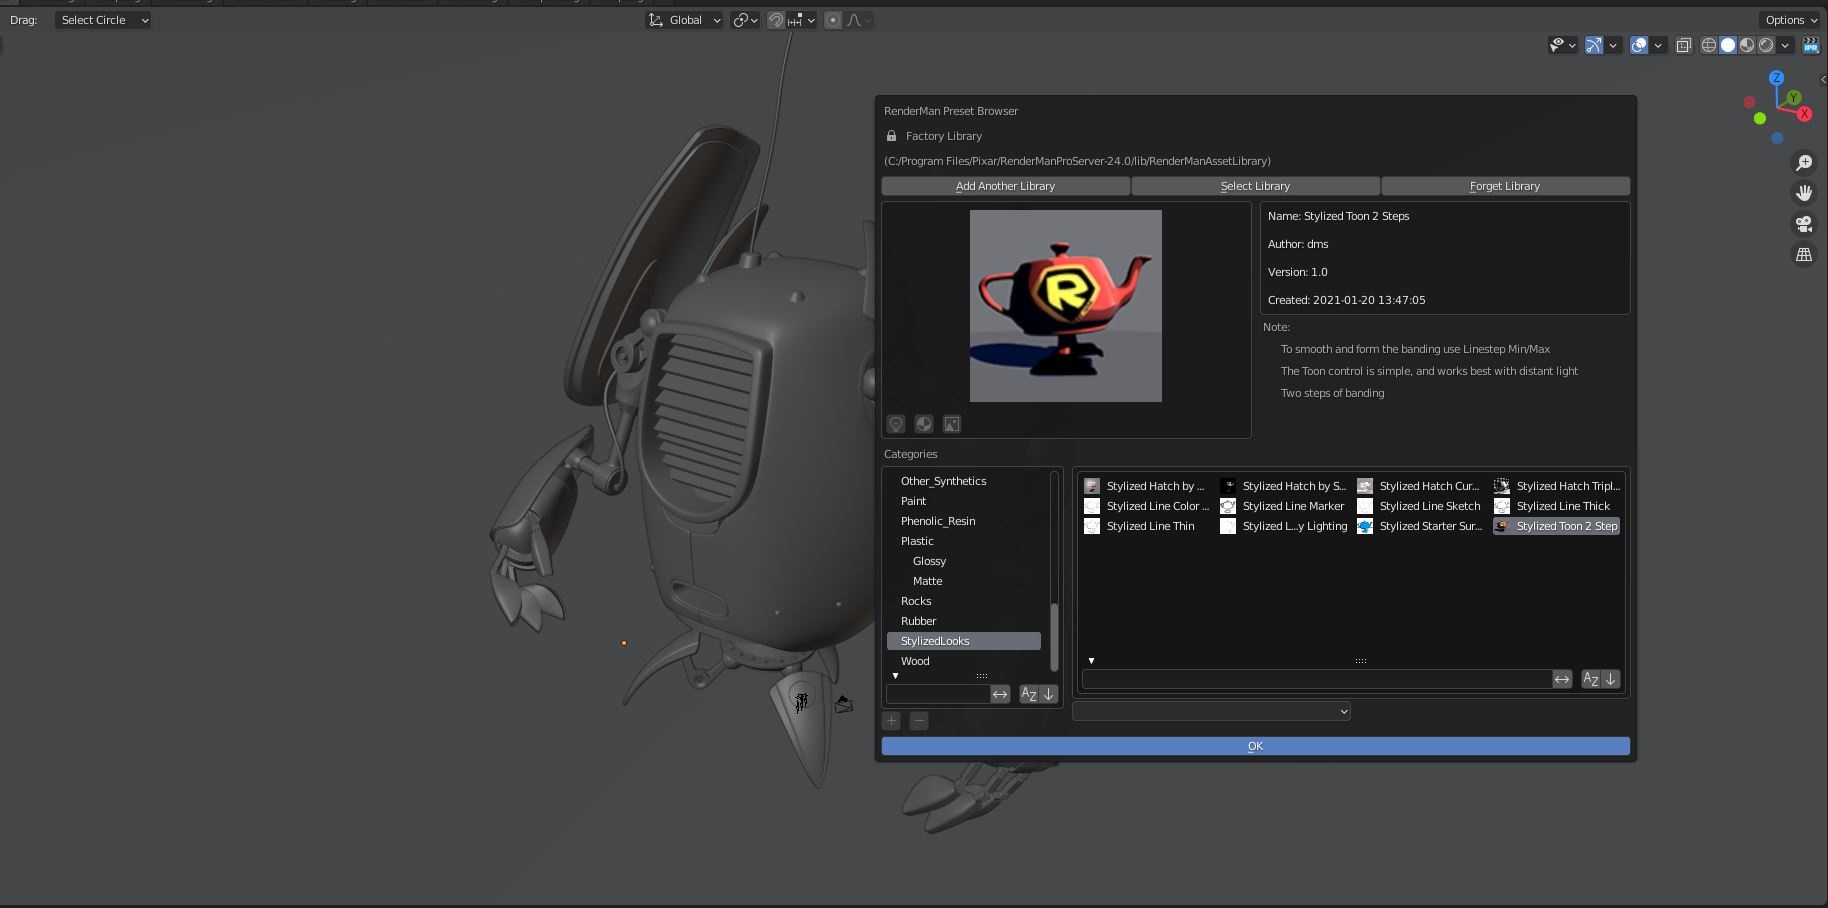
Stylized Looks also ships with several fun presets to get you started. You can find these inside the RenderMan Preset Browser
Lighting
 Although RenderMan for Blender will translate some of the native Blender lights, it is highly recommended that users use the “Pxr” lights.
Lighting in RenderMan is flexible but also very straightforward for users.
RenderMan includes a set of basic geometric lights, built-in. These specialized shapes - DomeLight, DistantLight, RectLight, and SphereLight (particularly the latter two) - can provide superior sampling behavior, compared with arbitrary geometry (i.e. standard geometric primitives with a light Bxdf attached). There’s also a PortalLight to improve lighting interior scenes lit indirectly through openings like windows and skylights as well as a Daylight simulation.
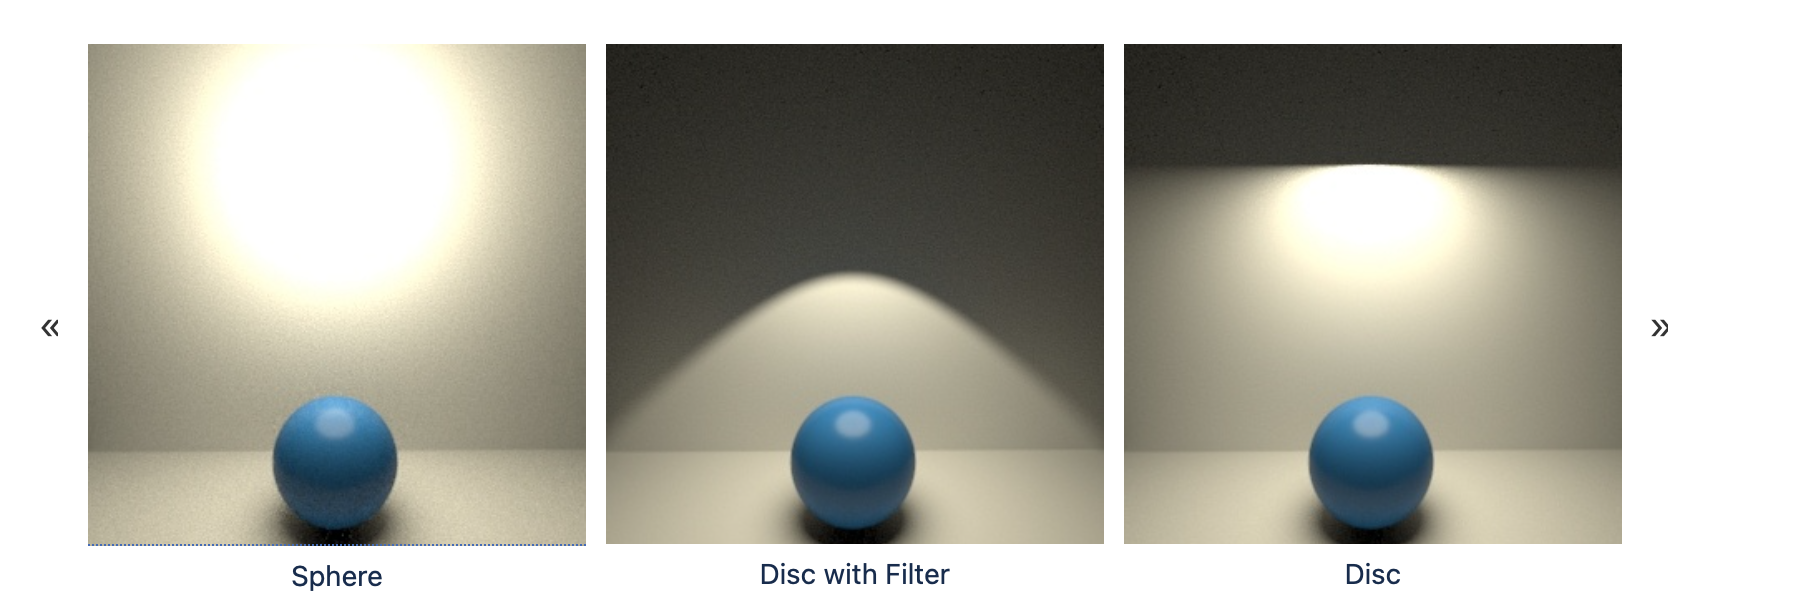
Light Filters can also be used to modify and direct the lighting with even more control and artistic options. You can find real-world possibilities like Gobos and Cookies as well as advanced ways to link and control results like object specific intensities from a single light.
Note that due to these optimizations, the spherelight requires that all scale transforms be uniform, e. g. X,Y, and Z scale must all be the same so as not to skew the sphere shape into an ellipse or other form.
Note there are three main ways to light a scene:
-
Analytic Lights - These are the preferred choice. These provide superior memory usage, flexibility, and speed. Their visibility is a simple on and off for camera visibility.
-
Mesh Lights - These are great for using arbitrary shapes in lighting. These consume more memory since they are geometry and complex shapes may increase noise. These can make use of visibility like any other object: camera, shadow/transmission, and indirect visibility.
-
Emissive Surfaces - These typically use a constant bxdf or “glow” parameter to light a scene indirectly. This is inefficient and should usually be avoided but may be useful for texture mapping “lights” onto futuristic objects and panels!
Analytic Light Types
-
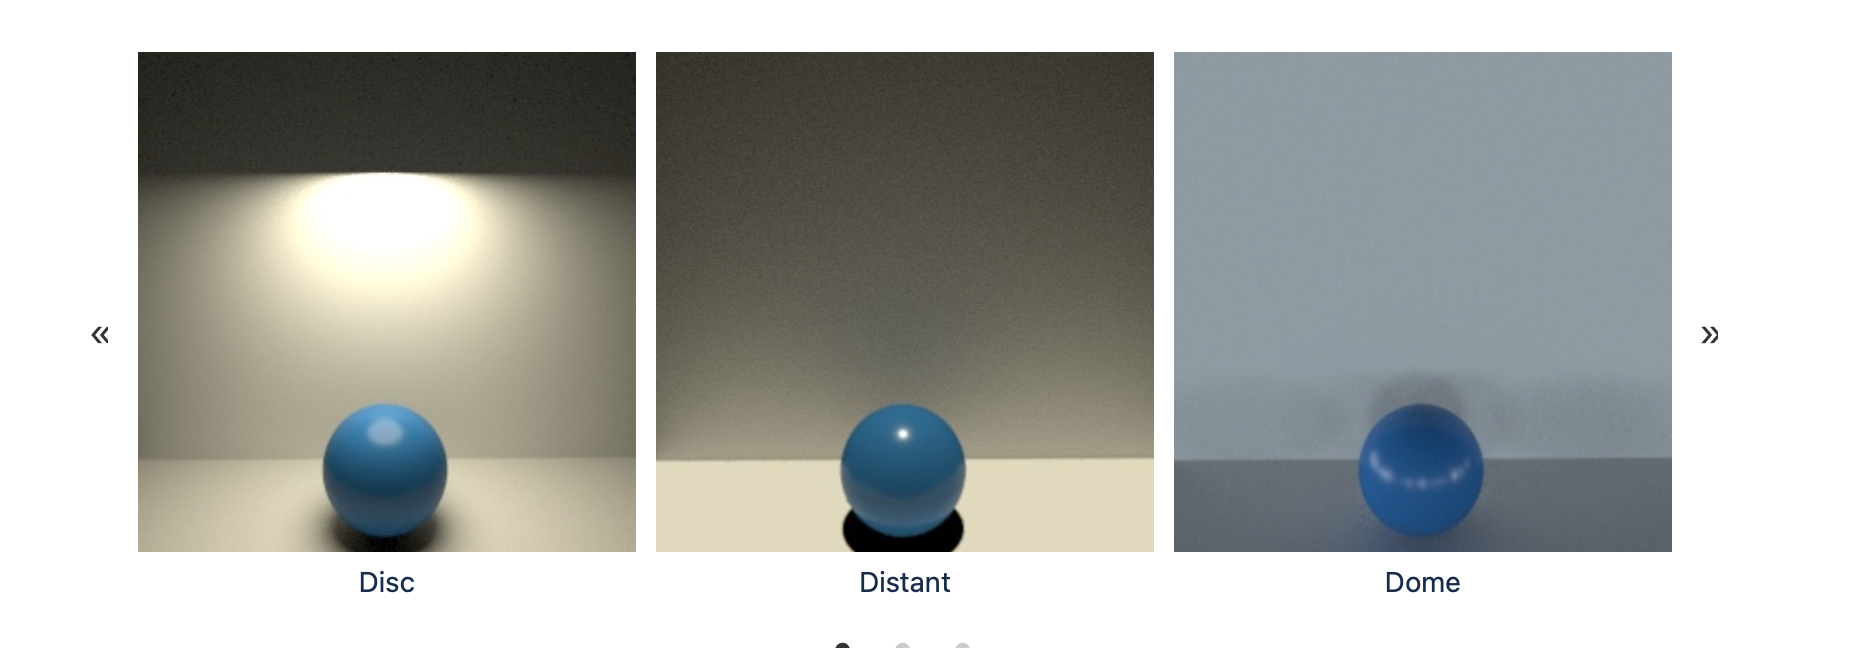
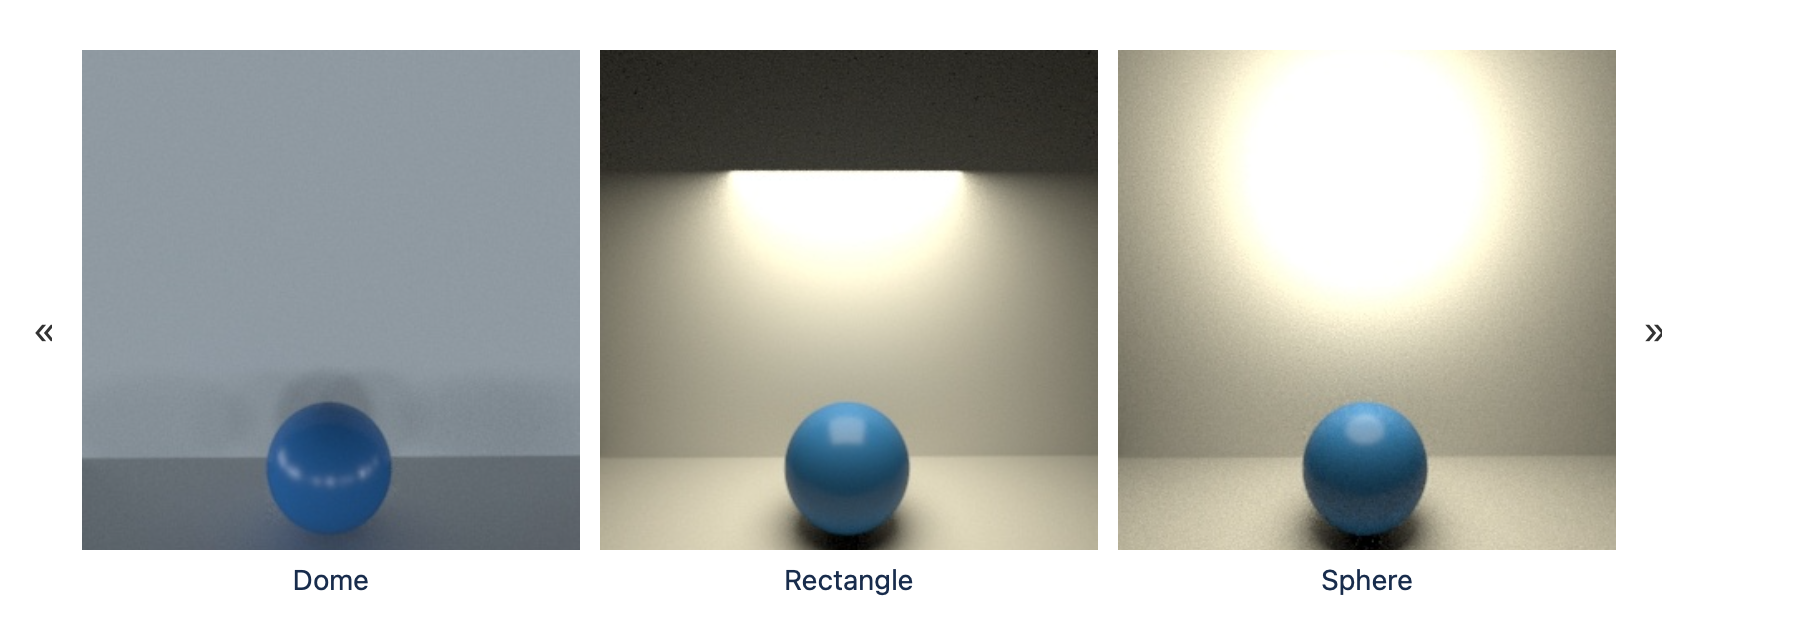
PxrDomeLight - The domelight acts as the environment light for a scene and is often mapped with a high dymanic range image (HDRI).
-
PxrRectLight - The rectlight is the commonly used rectangle-shaped area light.
-
PxrDistantLight - This light is perfect for use as a Sunlight or other distant source where light rays are nearly parallel and cover the whole scene.
-
PxrDiskLight - Great for using as an area light or in combination with filters to make a spotlight.
-
PxrSphereLight - For users that miss using a point light, this light can be useful to illuminate in all directions.
-
PxrEnvDaylight - A daylight simulation shader where you can supply any time and location on Earth or simply place your sunlight where you like it.
-
PxrPortalLight - For difficult lighting situations like indirectly lit interiors, this light along with the PxrDomeLight can be used to increase the quality and speed of your renders.
Geometric Light Types
- PxrMeshLight - The mesh light uses a piece of geometry and turns it into a light source. This is much more efficient than using glow or emission from a bxdf. It’s great for things like neon lights.
Utility Light Types
PxrAOVLight - This is a utility that’s recognized as a light type but it doesn’t illuminate anything. It’s a useful tool for creating quick masks for objects through light linking.
Lights also have some special parameters regarding shadows and bidirectional path tracing made possible by the PxrVCM and PxrUPBP integrators. You can refer to the technical memo:
- Christophe Hery, Ryusuke Villemin, Florian Hecht. Towards Bidirectional Pathtracing at Pixar
Analytic Lights in Blender
Creating Lights
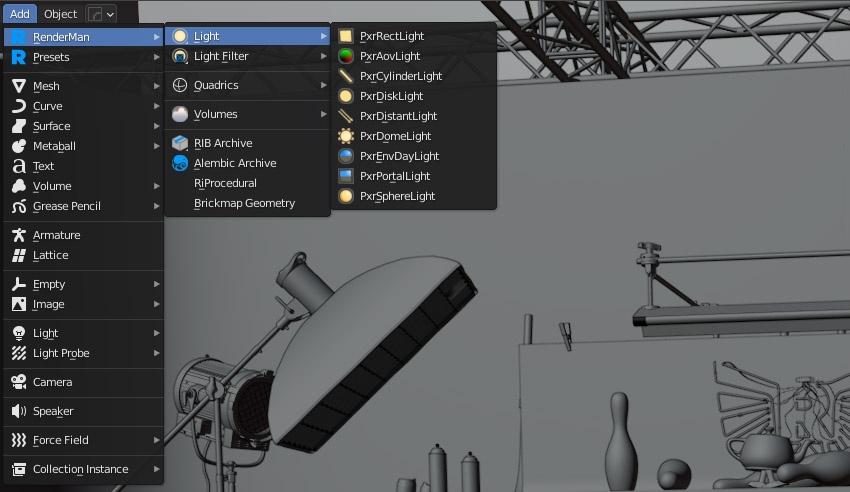
RenderMan lights can be created from the Add menu.
Analytic Light Types
For detailed information about parameters, follow the links for each light type.
-
PxrRectLight – This is the commonly used rectangle-shaped area light
-
PxrCylinderLight – This is the commonly used cylinder area light used to mimic fluorescent lights and light sabers
-
PxrDiskLight – The disk is great for using as an area light or in combination with filters to make a spotlight
-
PxrDistantLight – The distant light is perfect for use as a sun or other distant source where light rays are nearly parallel and cover the whole scene
-
PxrSphereLight – For users that miss using a point light, this light can be useful to illuminate in all directions
-
PxrAovLight – This is a utility light for outputting an AOV mask, it has no manipulator since it does not illuminate. Its position isn’t important in the scene
-
PxrDomeLight – The dome light acts as the environment light for a scene, and is mapped with a high dymanic range image (HDRI), very common workflow
-
PxrPortalLight – For difficult lighting situations, like indirectly lit interiors, this light along with the PxrDomeLight can be used to increase the quality and speed of your renders. Portal lights need to be associated with a dome light. Simply parent the portal light object under the dome light in the outliner.
-
PxrEnvDayLight – This is a daylight simulation shader where you can supply any time and location on Earth or simply place your sunlight where you like it.
Mesh Lights in Blender
Creating Mesh Lights
Any piece of geometry can become a light source in RenderMan for Blender. Always use Mesh Lights for objects with high light emission and always perfect for neon signs !
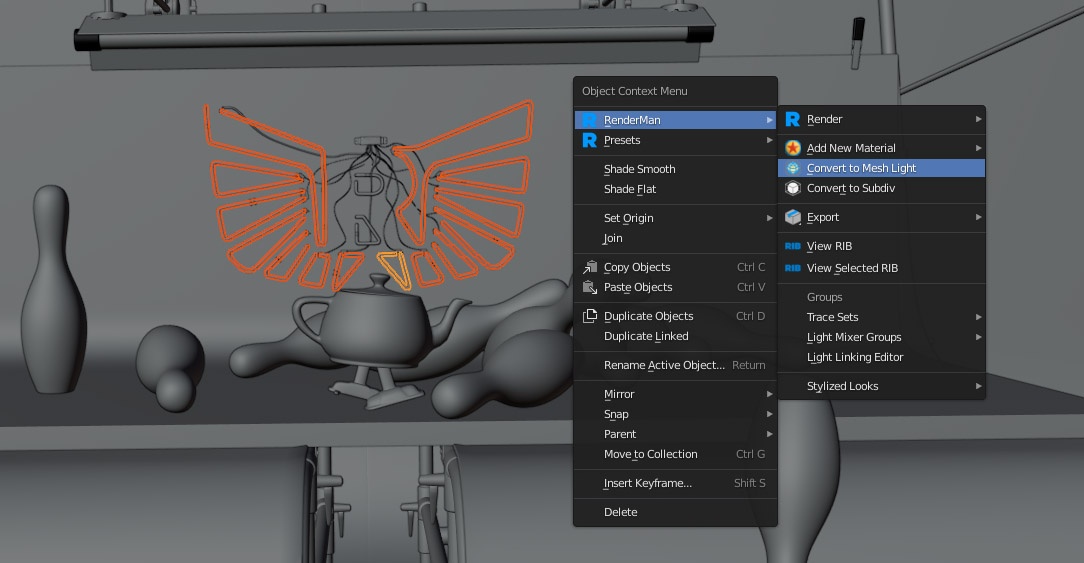
Select the geometry that should become emissive and click on Convert to Mesh Light button from the object context menu.
The next time you render, the object will cast light and itself have a constant color which comes from the PxrMeshLight’s color and intensity.
PxrBlack
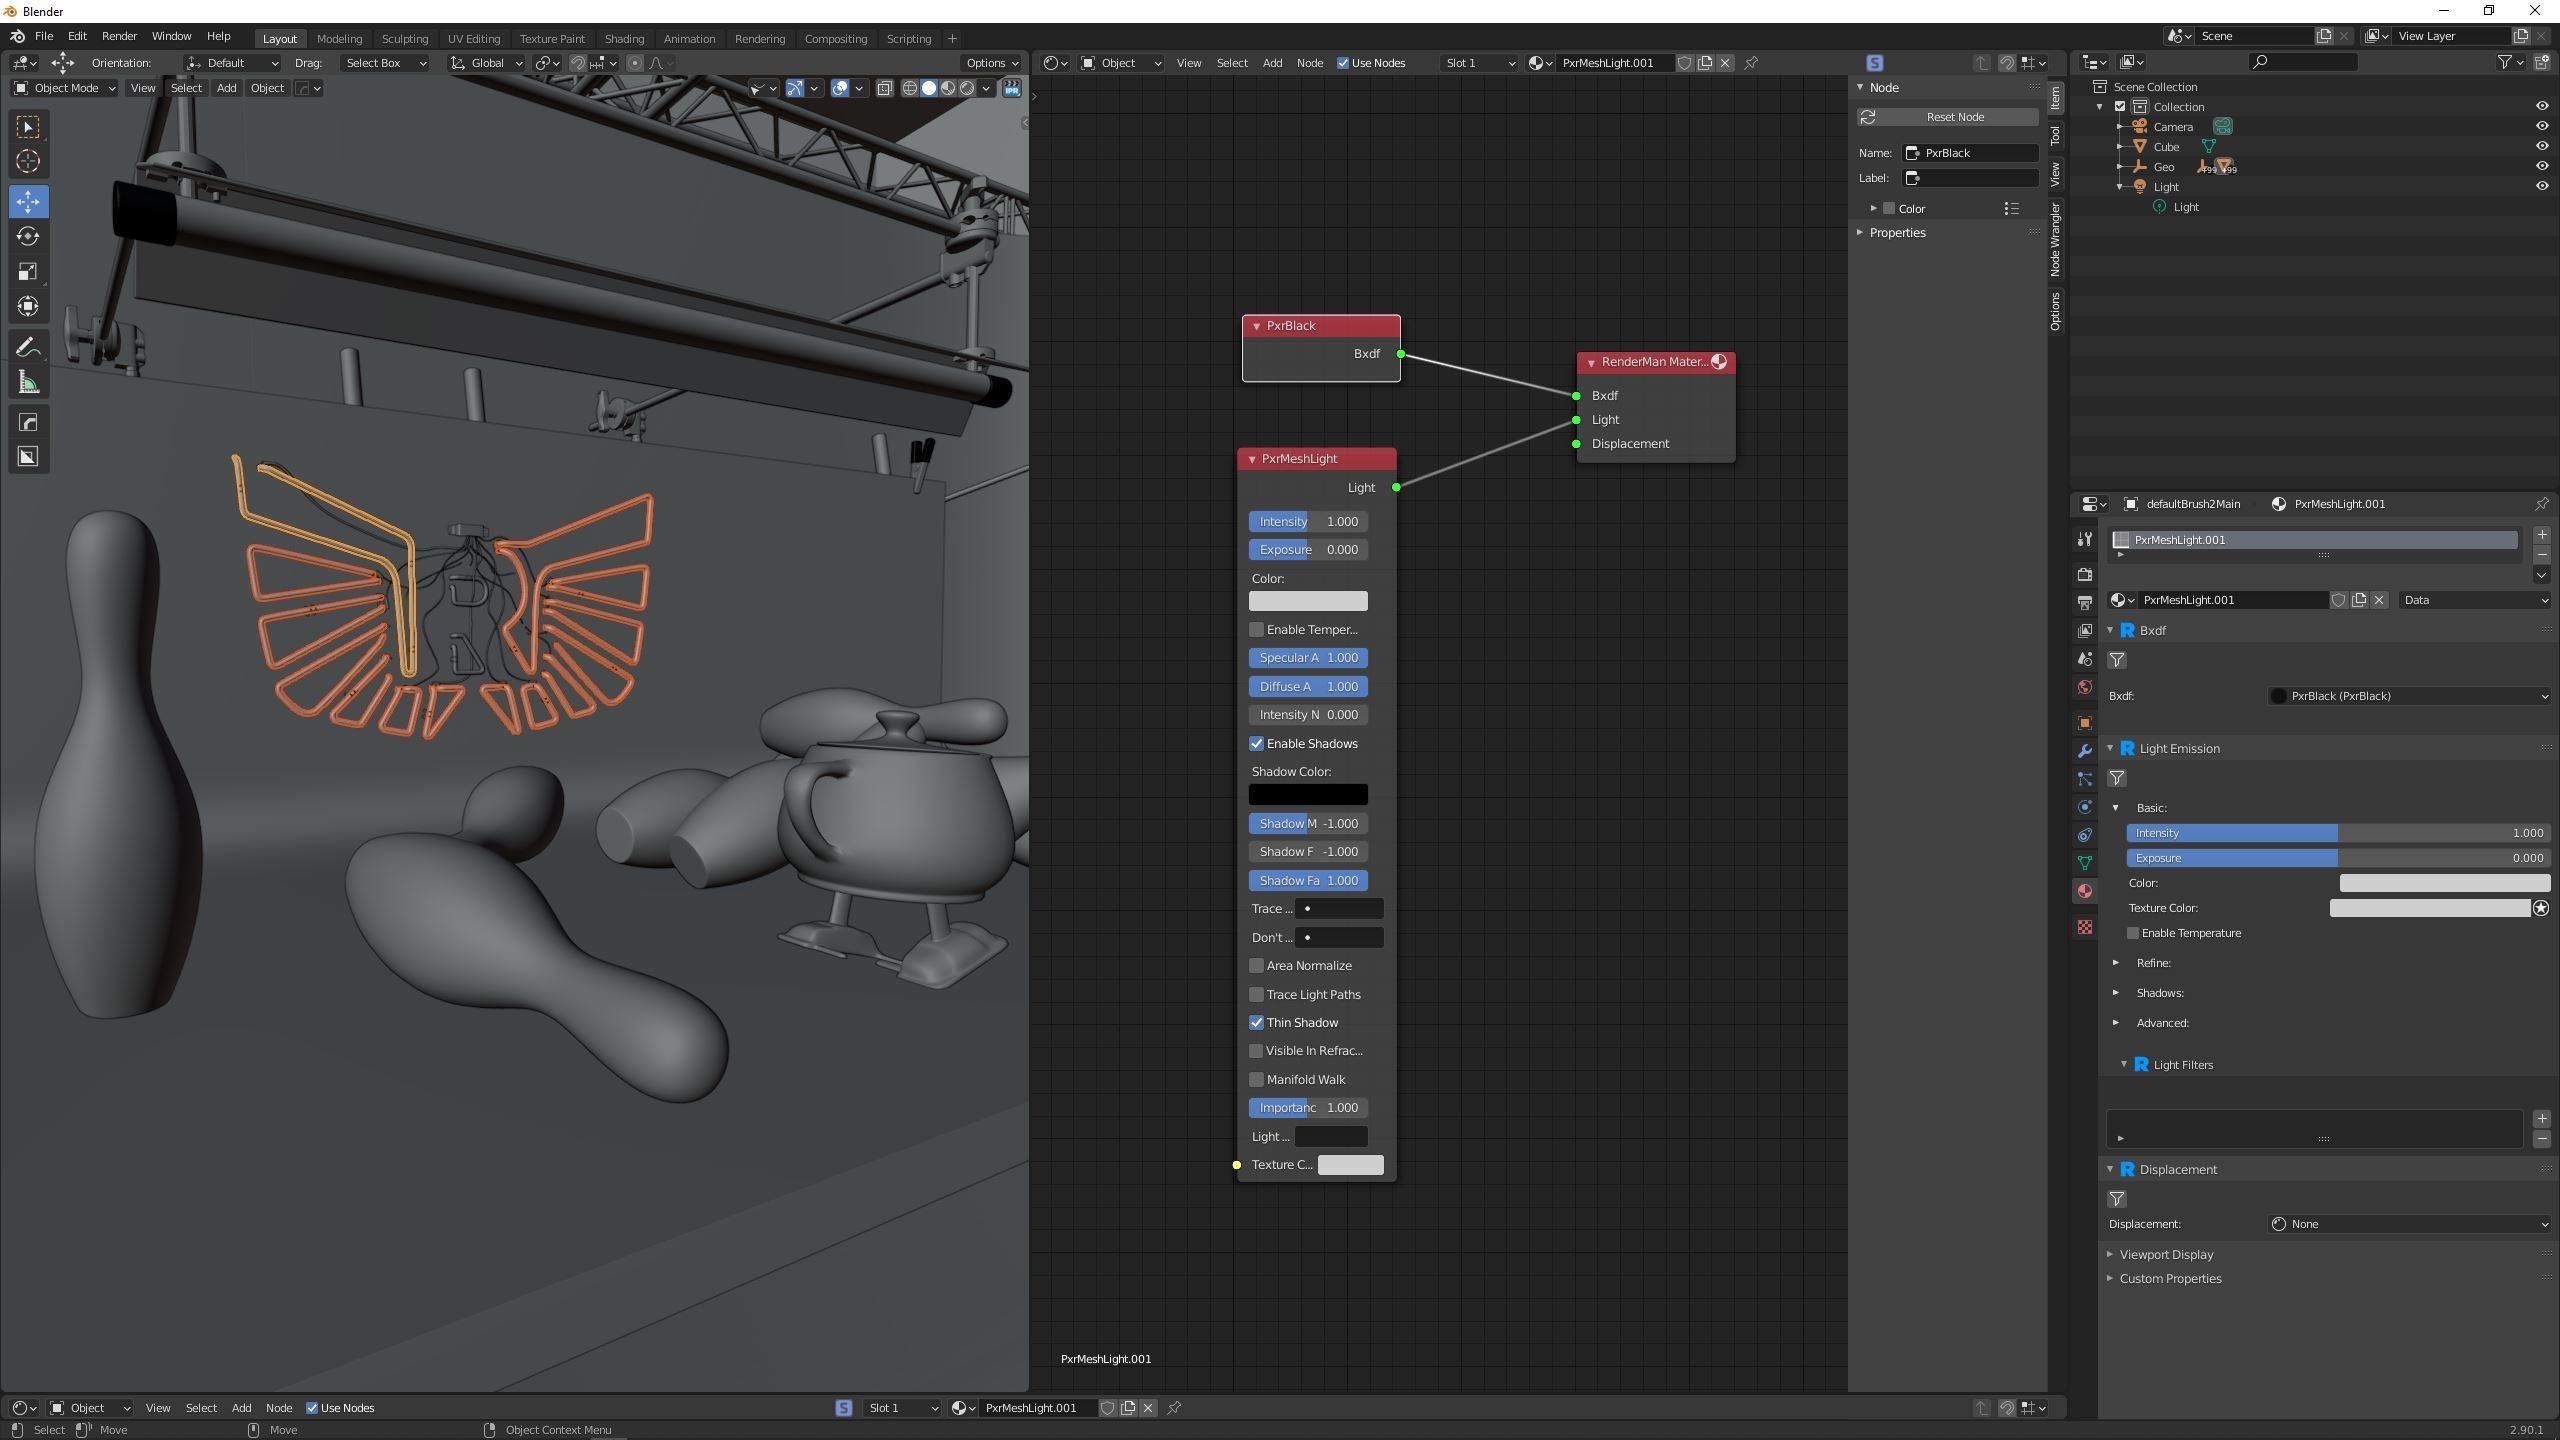
When the Mesh Light button is clicked, a new material called PxrBlack is assigned to the selection, and a PxrMeshLight is created and wired into the material of the PxrBlack material.
PxrBlack acts as a dummy material. It doesn’t actually have any parameters.
For most purposes, PxrBlack is an appropriate material, but you can experiment with using others, like PxrVolume. The easiest way to set that up is to begin with the Mesh Light button.
Then, select the shading group for the PxrBlack and wire in a different surface or volume material there.
This way the area light is already wired into the shading group.
PxrMeshLight allows you to create arbitrary shapes and use them as bonafide light sources. This improves performance over emissive geometry and provides great flexibility for creating things like neon lights, futuristic light panels, and deforming shapes that light a scene. The parameters are simple and easy to tune.
In creating a meshlight, you may see a material connected to it called PxrBlack. This material has no parameters and is designed to prevent the mesh from scattering light a second time from itself. This is done to provide something intuitive, not necessarily something physical.
Parameters
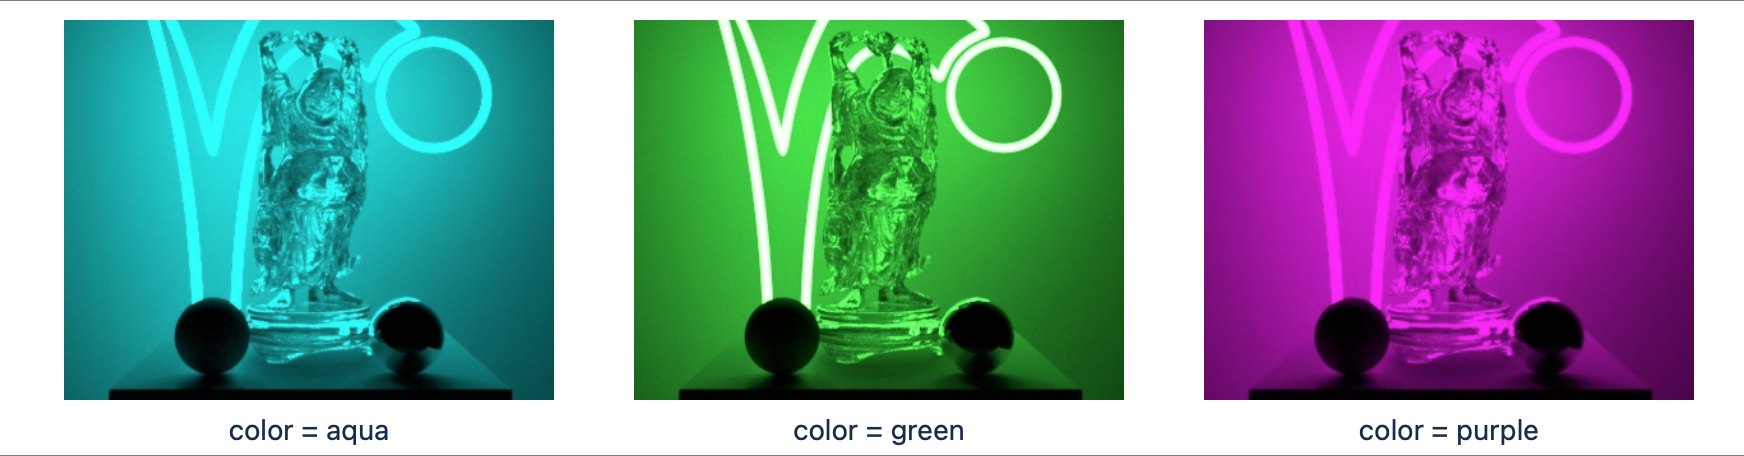
Color
The color of the emitted light.
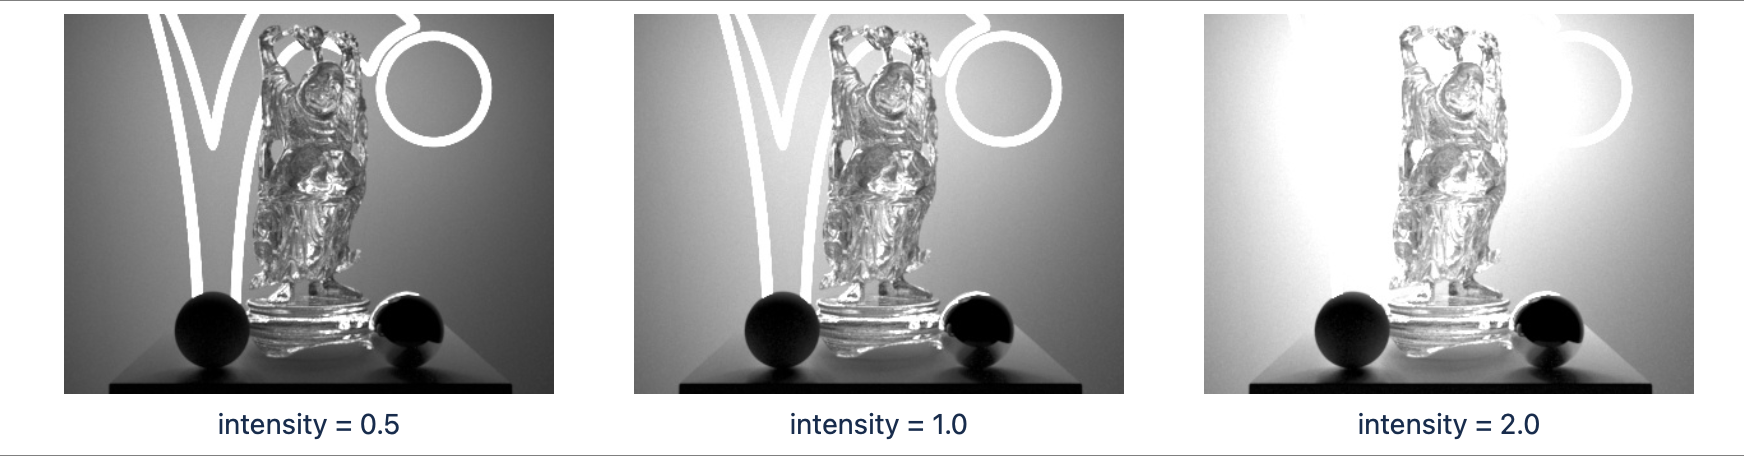
Intensity
cales the contribution of this light linearly. The light intensity is computed using physical falloff.
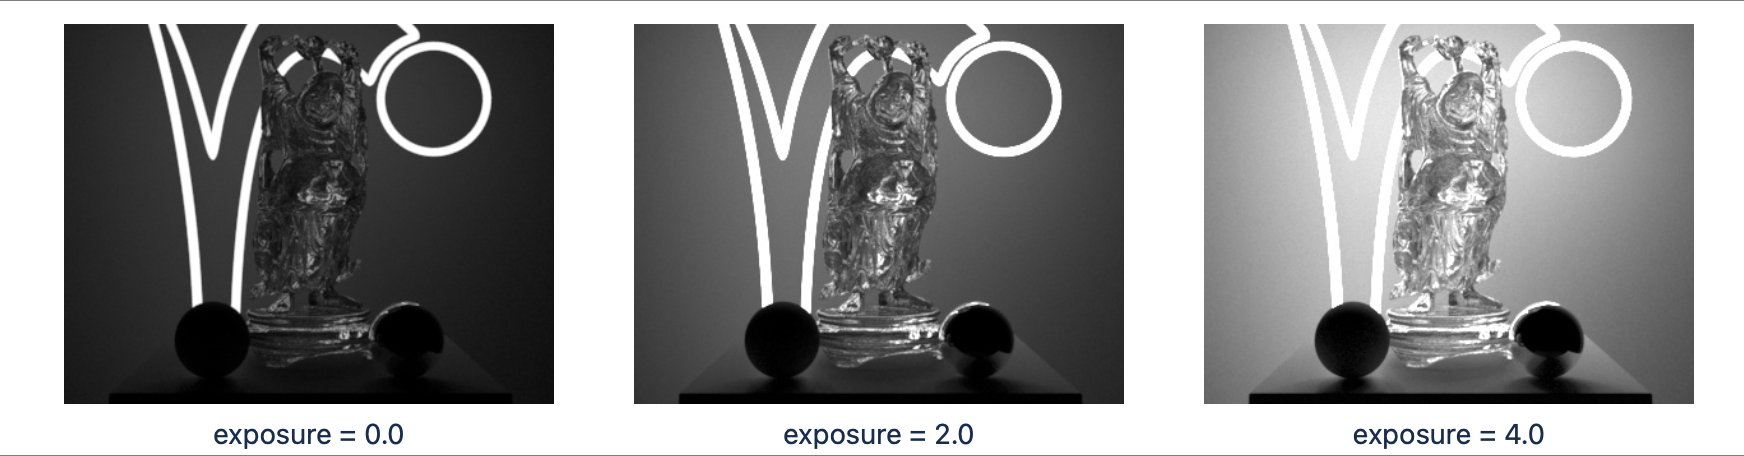
Exposure
Specifies the exposure of the area light as a power of 2. Increasing the exposure by 1 will double the energy emitted by the light source. A value of 0 produces an intensity of 1 at the source, -1 produces 0.5. R eal world lighting has high energies and typical exposures are low values while you may have to type a really large number for equivalent Intensity. This is also comfortable to artists familiar with photographic measurements.
Texture Color
An image to use as a light source using a pattern node, e.g. PxrTexture. Preferably a High Dynamic Range source. Notice this affects color and shadowing based on the contents of the HDRI used. If forced to use an 8-bit source such as a JPEG image, it should be linearized (transformed to linear color space) before use as a color. Since this is indeed a mesh, you must have defined UVs or appropriate projections to place your texture correctly.
Enable Temperature
Turns color temperature on or off.
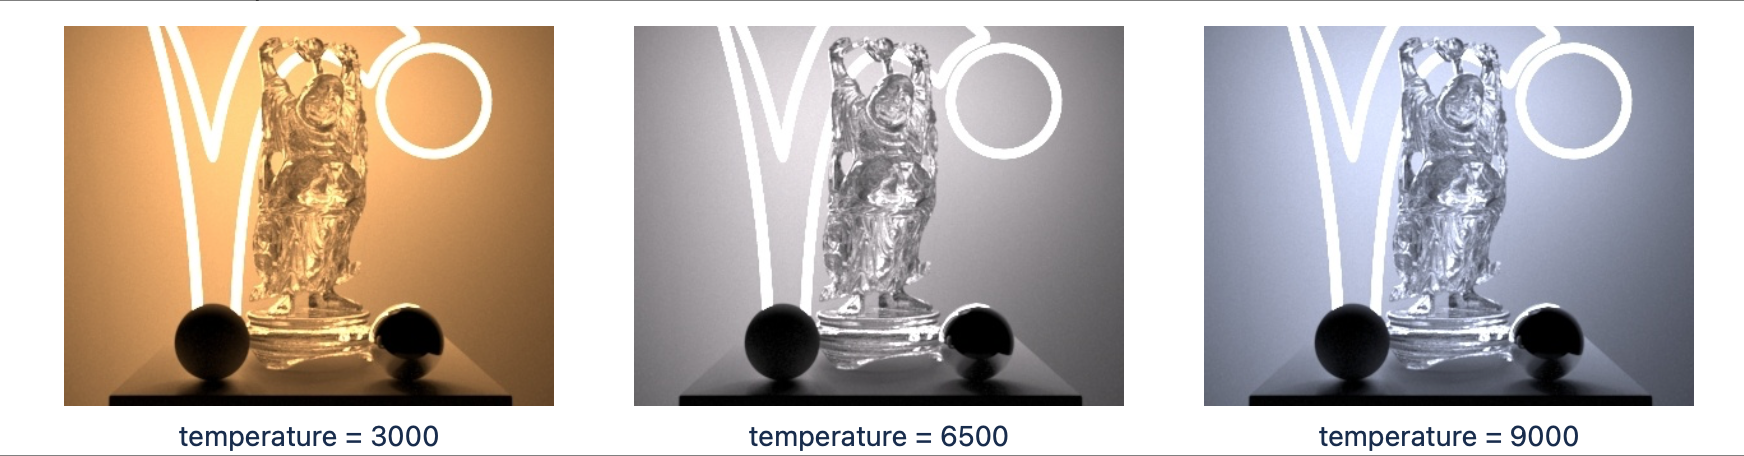
Temperature
Allow the user to choose the color temperature of the light in Kelvins. Unlike the basic light color, this allows the user to easily pick plausible light colors based on standard temperature measurements.This control will act like a filter or gel (a tinted transparent surface) in front of your light. If your light is white, you will get the chosen color temperature. If your light is colored, the color temperature will make it cooler (over 6500K) or warmer (below 6500K).
Refine
Specular Amount
Amount of specular light that is emitted. This is a non-physical control. You could use a light with Specular Amount 0.0 to act purely as a source of diffuse light for your scene objects and avoid adding highlights.
Diffuse Amount
Amount of diffuse light that is emitted. This is a non-physical control. You could use a light with Diffuse Amount 0.0 to act purely as a source of highlights for your scene objects.
Advanced
Area Normalize
When normalize is enabled, the amount of light contributed to the scene will not change as you scale the light source. This makes it easier to adjust highlight size without changing scene lighting.
Trace Light Paths
Enable light and photon tracing from this light. This value enforces a physically-based light and as a side-effect disables the above Shadows controls. Users may use this feature to selectively decide which lights emit photons when using the PxrVCM or PxrUPBP Integrators.
Thin Shadow
Enable thin shadow and disable refraction caustics for this light. This parameter will ignored if Trace Light Paths is enabled. This is a non-physical control that creates “fake” colored shadows for transmissive objects without needing to generate photons for caustics.
Fixed Sample Count
An override of the number of light samples to be taken for this light source. It will override the sampling performed by the integrator. It’s recommended to leave this at the default unless you experience unsolvable noise from the light.
Light Group
Specify the light group name used for light group LPEs. This is useful to generate per-light AOVs for later adjustment in compositing.
Importance Multiplier
Rather than setting explicit Light Samples, users can change the amount of samples the light will be assigned internally by changing this value. RenderMan creates a set of samples at render time for all lights in the scene and changing this value rebalances the samples across the lights. Note that increasing this value will cause more samples to be selected from this light while reducing it for others in the scene. Lower than the default will decrease the samples while providing more to others in the scene.
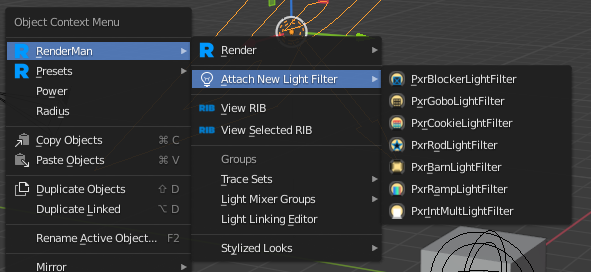
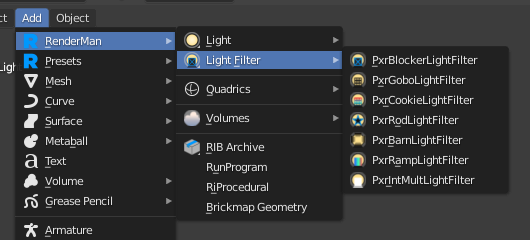
Light Filters in Blender
Light Filters are used to manipulate lighting results. In the real world this is often achieved through the use of stencils and gels to change the color, quality, and amount of light in a shot. RenderMan’s light filters are a powerful and flexible way to do the same (and even more) in lighting your scenes.
Create Light Filters
To add a light filter to a light, first create a light filter from the Add menu:
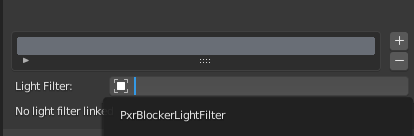
Next, select the light you want to be filter, and look at the object properties panel. You should see a Light Filters panel.
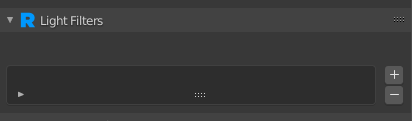
Click the + to add a new entry, then select which light filter object you want to link to.
Shortcut
You can also use the shortcut in the object context menu. Select the light you want to filter and select the light filter you want to add from the Attach New Light Filter menu. The new light filter will automatically be added to the light filters list.