
Reference
Cameras in Blender
Depth of Field in Blender
Depth of Field (DOF) is a photographic technique used to convey scale (size) and areas of interest in a composition.
Clever usage can lead a viewer to certain parts of your image and increase photorealism by correctly mimicking a real-world lens.
RenderMan provides controls for realistic and compelling images with depth of field. There are also options that are non-physical but great for creating art-directed imagery.
To begin using DOF in Blender, go to the camera data properties for the camera that you want to to render DOF from, and click the checkbox next to Depth of Field, as shown below.

-
F Stop: Like a real camera lens, this setting controls the strength of the effect. Lower values increase blur while higher values decrease blur.
-
Ratio: Depth of field aspect.
-
Blades: This determines the shape of the bokeh effect. If you choose fewer than three sides (triangle) the bokeh will be circular.
-
Rotation: This controls the angle where sides meet for non-circular bokeh shapes (Number of Sides is greater than 2).
-
Roundness: Values from 0 to 1 make the shape bow or flex outwards making it more rounded. Values from 0 to -1 bow inwards and make for sharper points.
-
Density: This controls the brightness across the bokeh shape. 0 to 1 makes it brighter at the outer edge like a catadrioptic lens (look it up, quite interesting). 0 to -1 makes it brighter in the center and falloff towards the edges.
For more information on the various aperture controls, see Bokeh.
Focus
-
Distance: The distance to the object or location you want in-focus (sharp) measured in scene grid units. This is referred to as the Focal Plane.
-
Focus Object: You can also select an object from the scene to be your distance. RfB will use this value over the value set for Distance.

Motion Blur in Blender
Let’s look at a simple scene which demonstrates the effects of motion blur settings.
The following images show the positions of two balls at frames 1, 2, and 3. In this example key-frames are made with linear tangents, so that as we observe shutter timing, the balls will maintain a fixed speed.
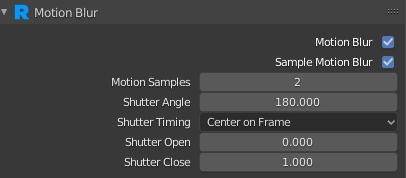
Motion blur can be enabled in the render properties , under the Motion Blur panel. By default it is not enabled.
Shutter Timing
Start on Frame
The following images show Start on Frame blur for frames 1, 2, and 3. The shutter opens at the start of the frame. The default shutter angle of 180 means the shutter is open for half of a frame. Notice how the last frame has no blur. This is because there is no animation after the time that the shutter opens for that frame.

Center on Frame
The following images show Center on Frame blur, which means the shutter opens before the frame, and closes after, centered on the frame. The blur for the first and last frames looks shortened, because the animation does not extend beyond those frames.

End of Frame
The following images show End of Frame blur, which means the shutter closes on the frame. Again, the first frame has no blur because there is no animation before that frame.

Motion Samples
Our red ball looks kind of odd in the second frame with centered blur. The blur is horizontal, when the ball really should reach an apex in the middle of that streak. By default, there are only two motion samples, because they are expensive, and two is often sufficient. You can change the global number of motion samples in Motion Blur panel of the render properties. Or if you know that only a particular piece of geometry requires extra samples, you can add them in the object properties for the sphere. Under the RenderMan Geometry panel you’ll see a checkbox to Override Motion Samples, and a Motion Samples property.

Two samples means that the position of the ball is sampled only at the shutter open time and shutter close. More than two samples are evenly distributed between shutter open and close. This is sometimes referred to as Multi-Segment motion blur.
For example, here’s how the image changes as we increase from 2 samples to 7. This is Frame Center blur. By the time we reach 7 samples, it looks pretty smooth! You can keep going has high as you like. There’s no limit to the number of samples.

In addition to motion paths, spinning objects often require extra motions samples. Let’s look at this color wheel. First, without blur:

Now, with 2 through 7 motion samples:

Shutter Angle

The shutter angle is an angle (out of 360 degrees) that determines what fraction of a revolution the camera’s shutter is open, for exposing the “film”. The default is 180 degrees, so the shutter will be open for half of the frame. The higher the shutter angle, the more blurry moving objects will look.
Let’s look at the example, with frame center blur, a bunch of motion samples, and shutter angles of 90, 180, and 360.

Shutter Open/Shutter Close
By default the shutter effectively opens and closes instantly. The Shutter setting is two values, a and b which are fractions of the shutter interval which let you adjust how long it takes the shutter to open and close. From 0 to a the shutter opens, and from b to 1 it closes.

Opens instantly at the start, and closes instantly at the end of the interval.

Spends the first half of the interval opening and last half closing.

Opens instantly at the start, then closes for the last half of the interval.

Opens instantly at the start and spends the whole interval closing.

Spends the first half of the interval opening, then closes instantly at the end.

Spends the whole interval opening, then closes instantly at the end.
Projection Plugins in Blender
Projection Plugins are the lens through which RenderMan views the digital scene. You can create custom projection plugins using C++. RenderMan comes with multiple plugins with PxrCamera being the common projection. The Omnidirectional Stereo projection renders images in a format suitable for VR viewing.
By default, RenderMan for Blender will map the default Blender camera types using the table below:
| Blender | Renderman |
|---|---|
| Perspective | PxrCamera |
| Orthographic | PxrOrthographic |
| Panoramic | PxrSphereCamera |
To explicitly set the projection plugin used for the camera, go to the camera data properties and go to the RenderMan Projection subpanel under the RenderMan Camera panel, and click Add Projection Plugin.

Next, select the projection plugin you’re interested and click OK.

You should now see parameters for the projection plugin in the panel.

Note, the Use Camera FOV option will copy what’s currently used for the camera’s field of view settings, effectively ignoring the FOV settings on the plugin. This help matches what the current view for the camera is in the viewport.
The technical images in this article about Renderman are copyrighted to Pixar Renderman.