Summary
This article will not go into too much technical details about ETH, but will mainly deal with how to become a validator of ETH 2.0.
At the end of this year, ETH will complete the stage 0 upgrade, migrating from PoW proof-of-work to PoS proof-of-stake. Before myself at the company’s hackathon com , I thought about how to use the excess arithmetic power to do something valuable. PoW is theoretically more wasteful of energy, and miners buy a lot of mining machines for computing, while after adopting the PoS mechanism, by becoming a validator, we can finish the Instead of buying a lot of mining machines to generate new blocks like PoW, to become a validator you need to lock a certain amount of cryptocurrency as proof of interest, if you run a verifying node to verify a block and check if all the transactions inside are valid, if it passes, you will receive a reward in return.
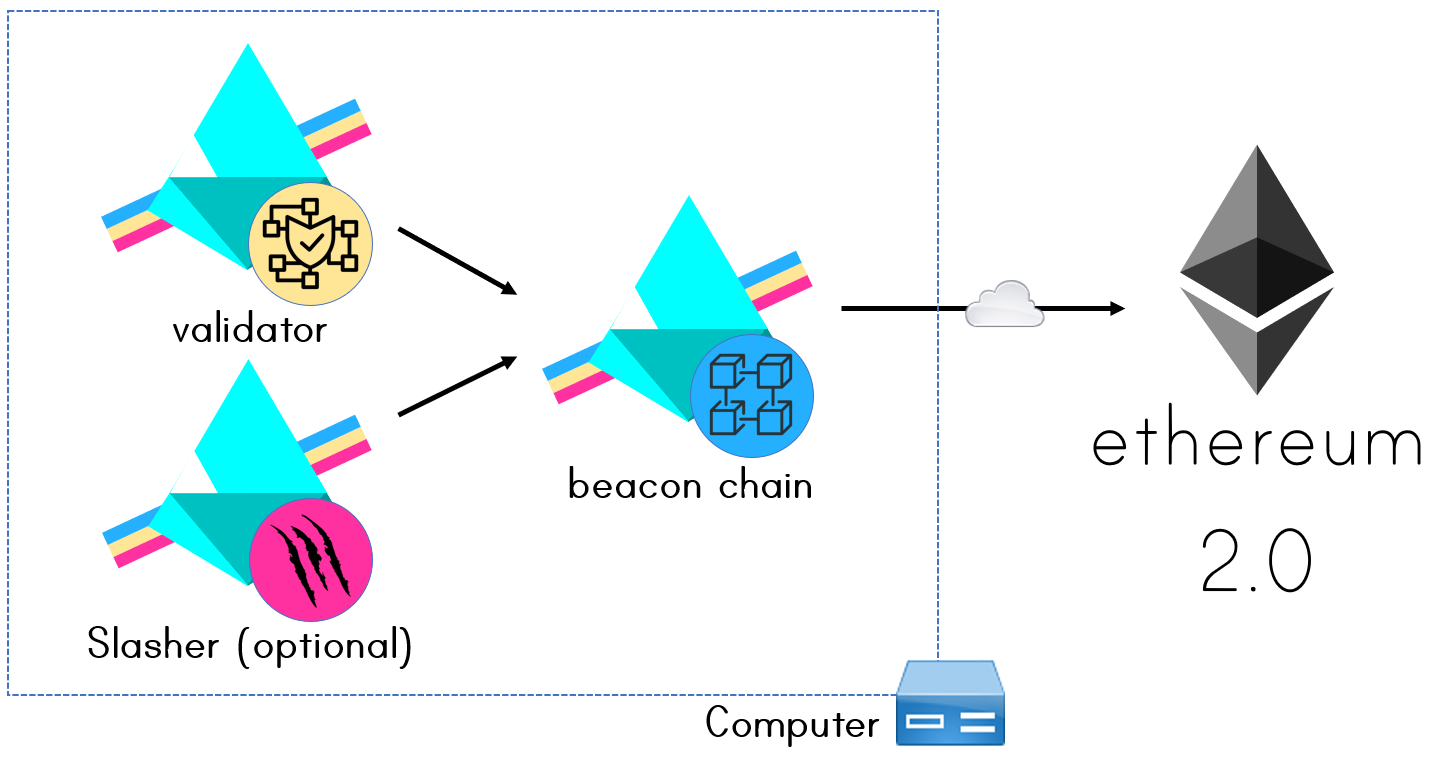
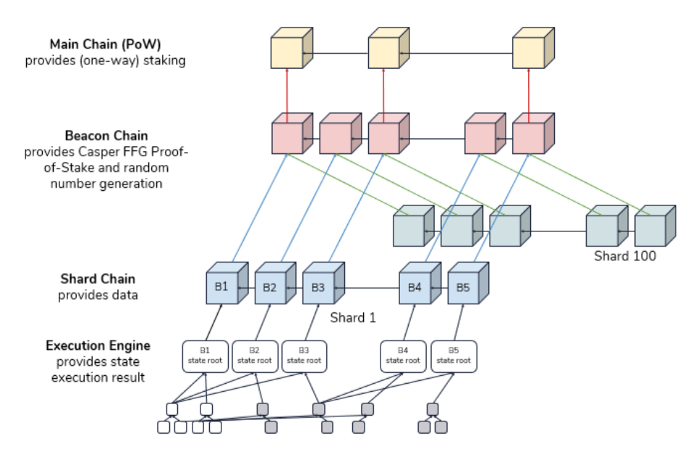
ETH2.0 architecture
Architecture diagram quoted from prylabs
-
Beacon Node,is the core component of ETH 2.0, similar to a lighthouse on the ocean, guiding the direction of a ship’s progress.
-
Validator Client will connect to the beacon chain and manage the pledged ETH key pairs.
How to join
ETH 2.0 is currently running on the Medalla(updated: current prater) test network
-
Start the Get Started session
-
Generate Key Pairs
-
This step is used to generate the key pairs for the validator
-
Select the OS you are using and install eth2.0-deposit-cli
-
Generate the key pair for example: python3 . /eth2deposit/deposit.py –num_validators 2 –chain medalla –folder . /keys/
-
The generated keystore will be stored in . The generated keystore will be stored in the . /keys folder, because it is currently a test network, so you need to specify –chain medalla, like deposit_data-1600238876.json file which stores public information, the next step we need to upload the file deposit_data-1600238876.json
-
-
Upload Deposit File: Upload the deposit_data-1600238876.json file
-
Connect Wallet: Connect to your own local wallet, here we use Chrome MetaMask plugin
-

-
If you don’t have test ETH inside your wallet, then you can go to here to request it and send a tweet containing your ETH address on your own Twitter account, like 0x0bDebe6eF5D0Ca744451946a70fEbd1B505dD92a my TestNet addr, then copy the link of the tweet to the submission item on the above website, and finally select 87.5ETH/9days, you will receive 87.5 test ETH, remember that on metamask must be Select the goerli testnet chain.
-
-
The next step is to hit the 32ETH to the corresponding Medalla Beacon Contract contract address, if you started two validators like I did, then the total is 64ETH, and once done, we can see a page like the following.
-
The last thing is to choose a multi-client that supports ETH 2.0, here we choose the golang version of prysm
-
Complete the deployment of the beacon chain and the validator validator
-
Deployment documentation can be found at here
-
Get prysm.sh: curl https://raw.githubusercontent.com/prysmaticlabs/prysm/master/prysm.sh –output prysm.sh && chmod +x prysm.sh
-
I’ll devote an article next week to how to achieve high availability of the authentication node for the specific deployment scenario
-
Import the key generated with eth2.0-deposit-cli, ./prysm.sh validator accounts-v2 import –keys-dir=$HOME/eth2.0-deposit-cli/validator_keys, import will let you regenerate a wallet and then import the keystore in the directory
-
Start prysm-beacon-chain: ./prysm.sh beacon-chain
-
Start validator: ./prysm.sh validator
-
Browse the Ethereum 2.0 Beacon Chain Explorer
-
-
Enter your own generated pubkey, which can be seen in a file like deposit_data-1600238876.json, e.g. “pubkey”: " a27a2f1bf0dbc8a0310eeb1e8da43443c54a58ed45df9fd896fa6b5b11b5b4dc074fac87fe0072ef2d5eaa0d1e4af0a3"
-
Here the selection [0xa27a2f1bf0dbc8a0310eeb1e8](https://beaconscan.com/validator/ 0xa27a2f1bf0dbc8a0310eeb1e8da43443c54a58ed45df9fd896fa6b5b11b5b4dc074fac87fe0072ef2d5eaa0d1e4af0a3)
-

-
Currently the validator is still in Pending state, we need to wait 5+ hours before it becomes active, when it is activated, we can see the validator node start to enter working state, the 32ETH we pledged will slowly rise in revenue over time, if the validator node goes offline, we will be penalized and a portion of the penalty will be deducted from the pledged amount.
-


Significance
Most of us will focus on the ETH price first, however guessing on the price is like a gambling game, I am currently more optimistic about the economic system of ETH and the EVM running on top of ETH, all this is done by code to make a fair deal, when ETH 2.0 comes online, myself will participate as a VALIDATOR, at least in a decentralized economic system, you can explore to discover the rules inside and then evolve those rules, unlike traditional financial markets where nothing is created under a centralized operation.