Images From Openebs
Preface
About OpenEBS
OpenEBS is an open source storage project running on Kubernets, in line with the CAS (Container Attached Storage) architecture. All of its components run at the user level and belong to the cloud-native distributed file system on k8s.
OpenEBS file system provides the following categories of features , each feature can be used in a particular environment solution .
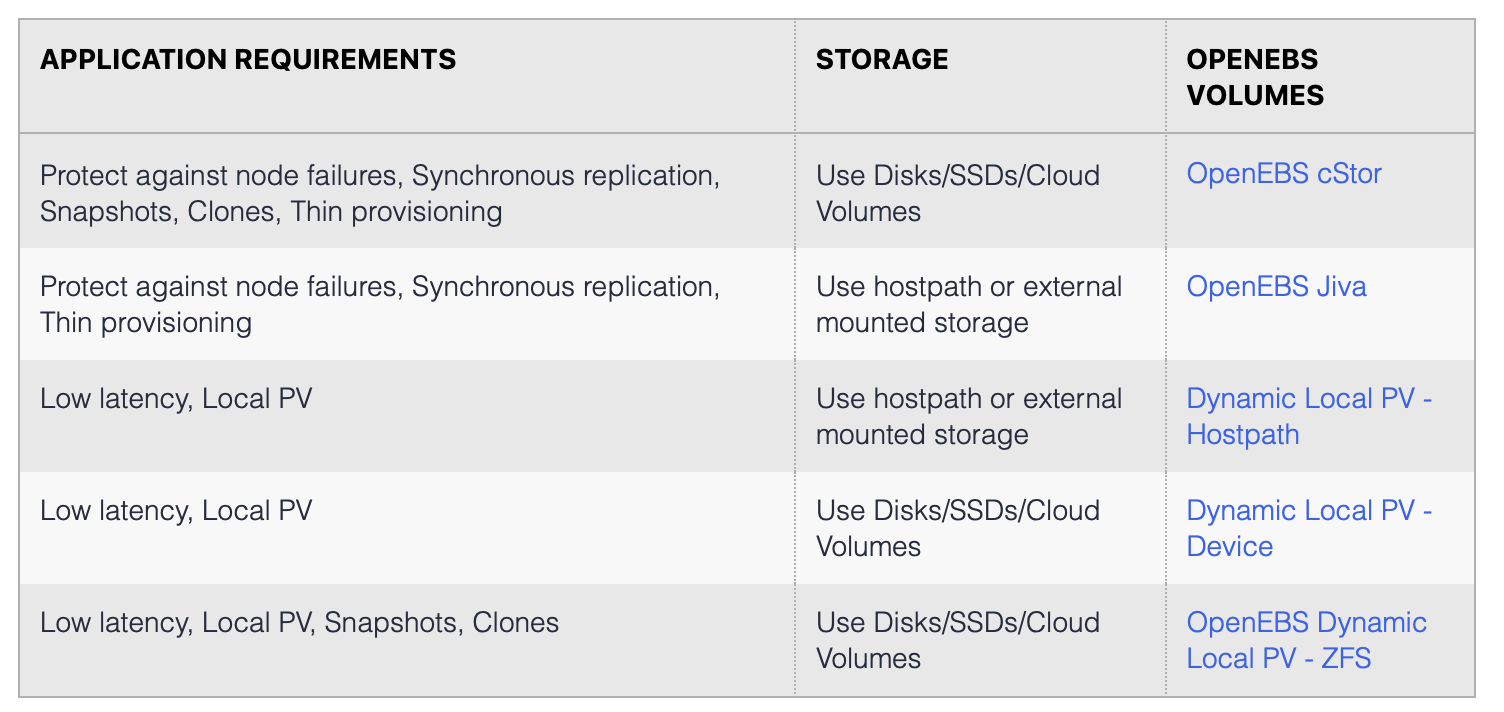
cStor: supports fault tolerance, high availability, replica copy, snapshot, clone, etc. Its backend is supported by ZFS.
Jiva: Young Longhorn backend engine, supports fault tolerance, replica copy, but no cStor snapshot and clone technology.
Dynamic Local PV HostPath: Direct use of local file storage, the advantage is low latency, the disadvantage is that it does not support high availability, once If the local node is down or the local disk is corrupted, the data will be lost.
Dynamic Local PV Devices: Similar to HostPath, directly uses local hard disk for storage, the disadvantage is that it also does not support high availability, but low latency.
Dynamic Local PV ZFS: Does not support high availability, but can use the features of ZFS (making snapshots and cloning technology), thus improving data protection and ease of data recovery from disasters.
Features
CAS Architecture:
PV and PVC are containerized for easy management by kubernets.
Synchronous Copies:
When using the cStor Jiva Mayastor storage engine, multi-copy synchronous copies are implemented to provide a highly available redundancy mechanism for data.
Snapshots and Clones:
When using the cStor storage engine, write-time replication snapshot technology is supported, generating snapshots helps us to roll back data, and cloning allows us to quickly Cloning allows us to quickly generate a set of production data so that development can use the real production data in the test environment.
Backup and Recovery:
Use backup tools and plugins to quickly back up files and restore them.
Monitoring:
The openebs component provides a Metric interface that allows prometheus to monitor and tune the performance of the storage solution.
Alpha Features
ARM64 support, which is why I am currently using it. I am setting up a set of Polkadot commissioned nodes running 7*24 hours, because it is directly linked to revenue, so I researched many containerized storage architecture solutions, although Openebs performance is not as good as other old distributed Although the performance of Openebs is not as good as other old distributed storage systems like Ceph, glusterfs, but it provides CAS architecture and high fault tolerance > mechanism, and support ARM64, so I decided to choose it for cloud storage architecture solution in financial industry.
Architecture
Single service based PV architecture
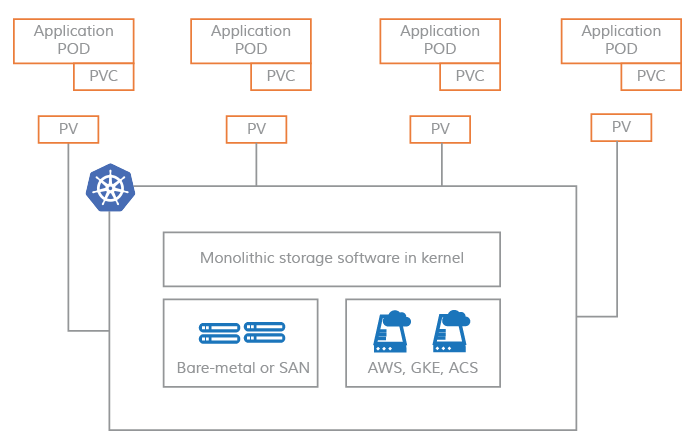
The underlying read and write operations of the entire PV are all done at the kernel level, and Kubernets only adds a layer of abstraction by exporting the PV to the user layer through the underlying distributed Kubernets only adds a layer of abstraction by exporting the PV to the user layer through the underlying distributed file read/write interface, and Pods are bound to the PV through PVCs for data read/write processing.
Microservices-based PV architecture
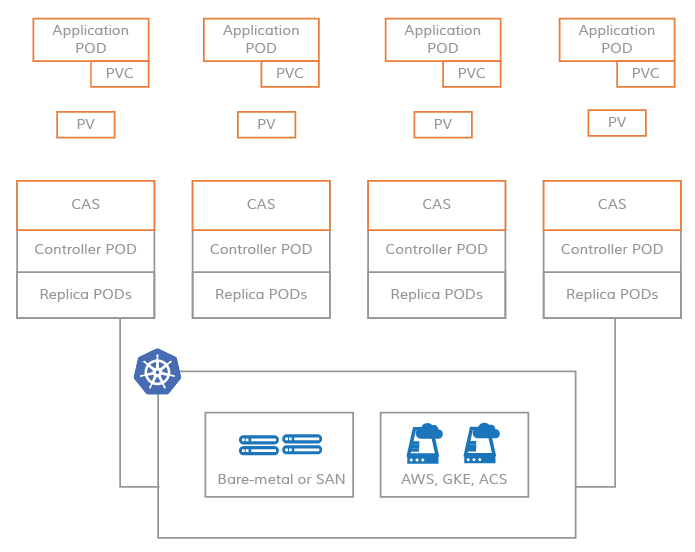
In a typical CAS architecture, all data read and write operations are handled at the user level, and all copies of the CAS architecture and storage controllers are scheduled by the kubernets themselves, with PVs acquiring storage devices directly from the underlying resources of the CAS controller, and Pods binding to PVs via PVCs to complete data read and write processing from >.
None CAS VS CAS
Advantages of CAS:
-
more agile, can directly optimize the storage controller at the Pods level.
-
more fine-grained monitoring, able to directly monitor the IOPS, read and write latency of each volume. 3.
-
decoupled, not dependent on third-party cloud storage systems, for example, you can migrate applications from one cluster to another without changing the yaml file. For example, you can migrate an application from one cluster to another without changing the yaml file. If you use None CAS, you will be very dependent on the storage management system that is not visible to Kubenets, and you need to modify the description of PV in the yaml file during the migration> process.
The advantage of cloud-native is that it can directly interface with other systems, such as file system monitoring and management, and use Kube CRD to directly call the underlying storage system. The cloud-native, the benefit is to be able to directly interface with other systems, such as file system monitoring, management, and direct calls to the underlying storage system using Kube CRD.
Micro Service Architecture
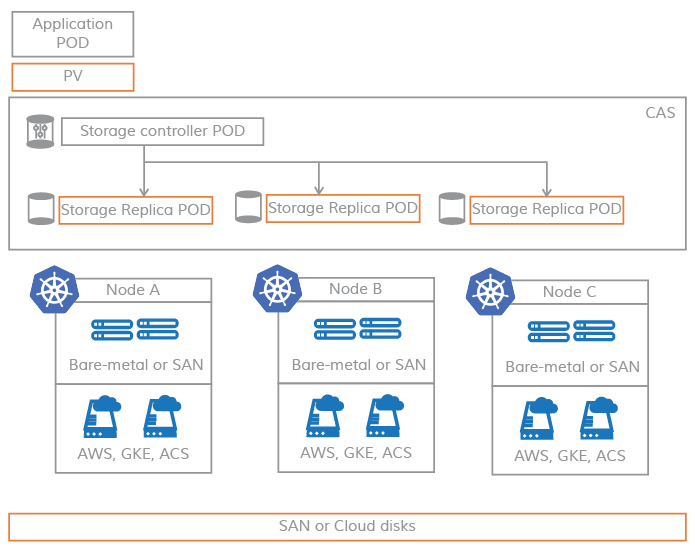
The use of microservices greatly improves the high availability of the distributed file system because the entire storage services all run at the user layer > and each service can be migrated from one node to another. As long as we meet the availability of the replicas, even if a node > goes down, it will not image our online data access and ensure the availability of the system.
From the above diagram, we can see that Storage Controller directly manages the Pods related to the underlying replica processing, and the Pods in the application layer communicate with Storage Controller through PV.
OpenEBS Components
-
Control components
-
maya-apiServer
-
provisioner
-
NDM Operator
-
NDM Daemonset
-
-
Data components
-
cStor
-
Jiva
-
LocalPV
-
Controller
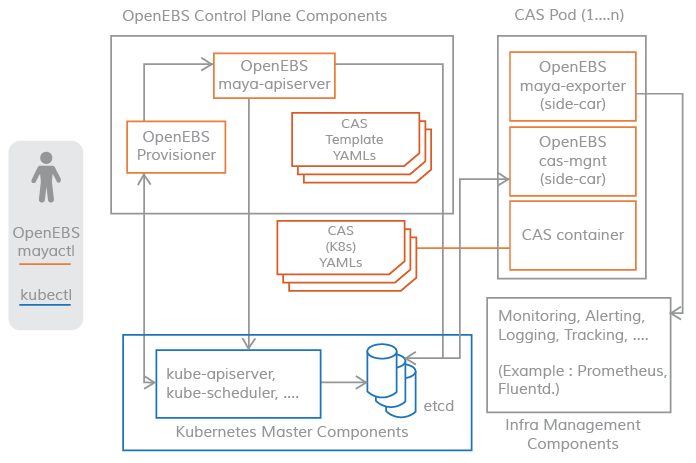
The controller consists of two main parts: maya-apiServer provisioner
provisioner: initializes the storage
maya-apiServer: provides the storage API interface and calls kube-api to create Pods for storage data management
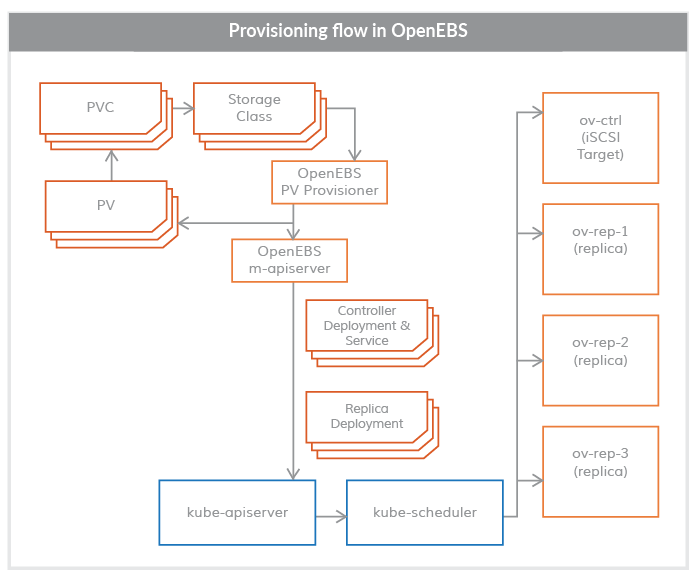
From the analysis in the diagram, the following call flow can be derived:
kubectl calls kube-api to request a PVC, provisioner manages the underlying storage via the iSCSI protocol, provisioner creates a PV and PVC according to the user’s needs, and provisioner creates a PVC according to the user’s needs. The provisioner creates PVs and PVCs according to the user’s needs, and the provisioner interacts with the maya-apiServer to create the Volume Controller Pod and the Volume Replica Pod.
maya-apiServer
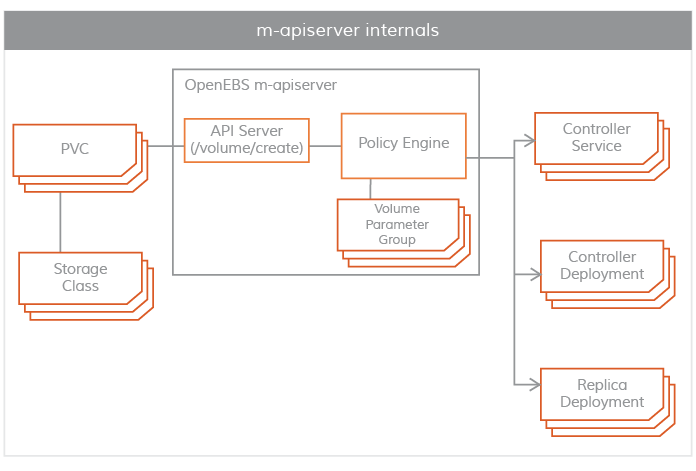
maya-apiServer provides the OpenEBS REST API. When the provisioner finishes creating the PV, maya-apiServer will receive the request from the provisioner and maya-apiServer will call the kube-api interface to start the Controller Pod and the Volume Replica Pod according to the user-defined storage engine.
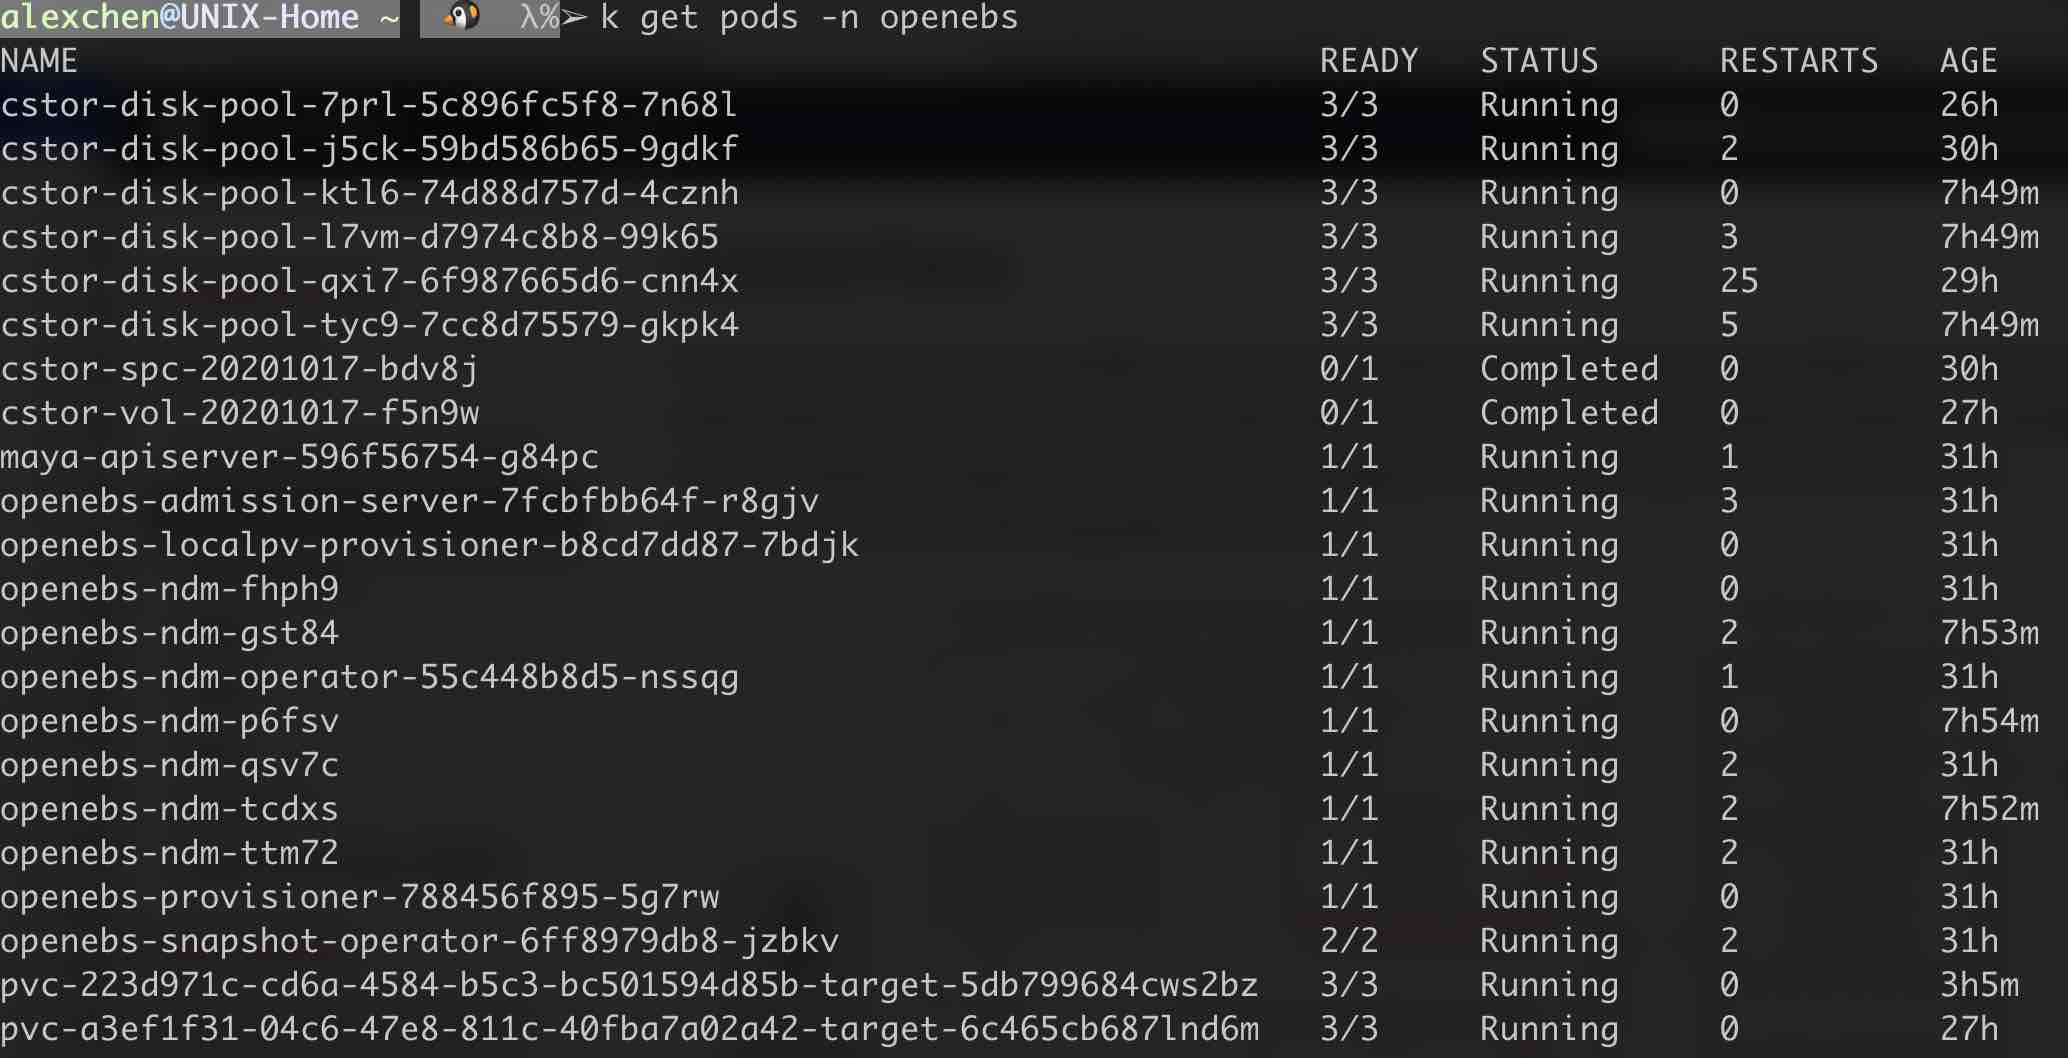
The Controller Pod and Volume Replica Pod, which we call the data side components, run as SideCars, as shown in the command line window above pvc-223d971c-cd6a-4584-b5c3- bc501594d85b-target-5db799684cws2bz such a Pod, where the three containers running are cstor-istgt, cstor-volume-mgmt, maya-volume-exporter, these Pods we uniformly We call these Pods Storage Controller Pods.
cstor-volume-mgmt: Provides configuration information for cStor Controller and cStor Replica.
maya-volume-exporter: Monitor statistics, including file system read/write latency, read/write IOPS, and file system capacity.
Similar to cstor-disk-pool-7prl-5c896fc5f8-7n68l, which we call CAS Pods, where the running containers are are cstor-pool, cstor-pool-mgmt, maya-exporter.
Node Device Manager
In the command line diagram we can see this Pods openebs-ndm-fhph9, this is the Node Device Manager, whose the role is to discover, monitor, and manage the underlying disks for provisioner.
NDM DaemonSet runs on each node and automatically discovers available disk blocks based on the user’s own configured NDM Configmap, > adding them to the blockdevice list.

CAS Engine
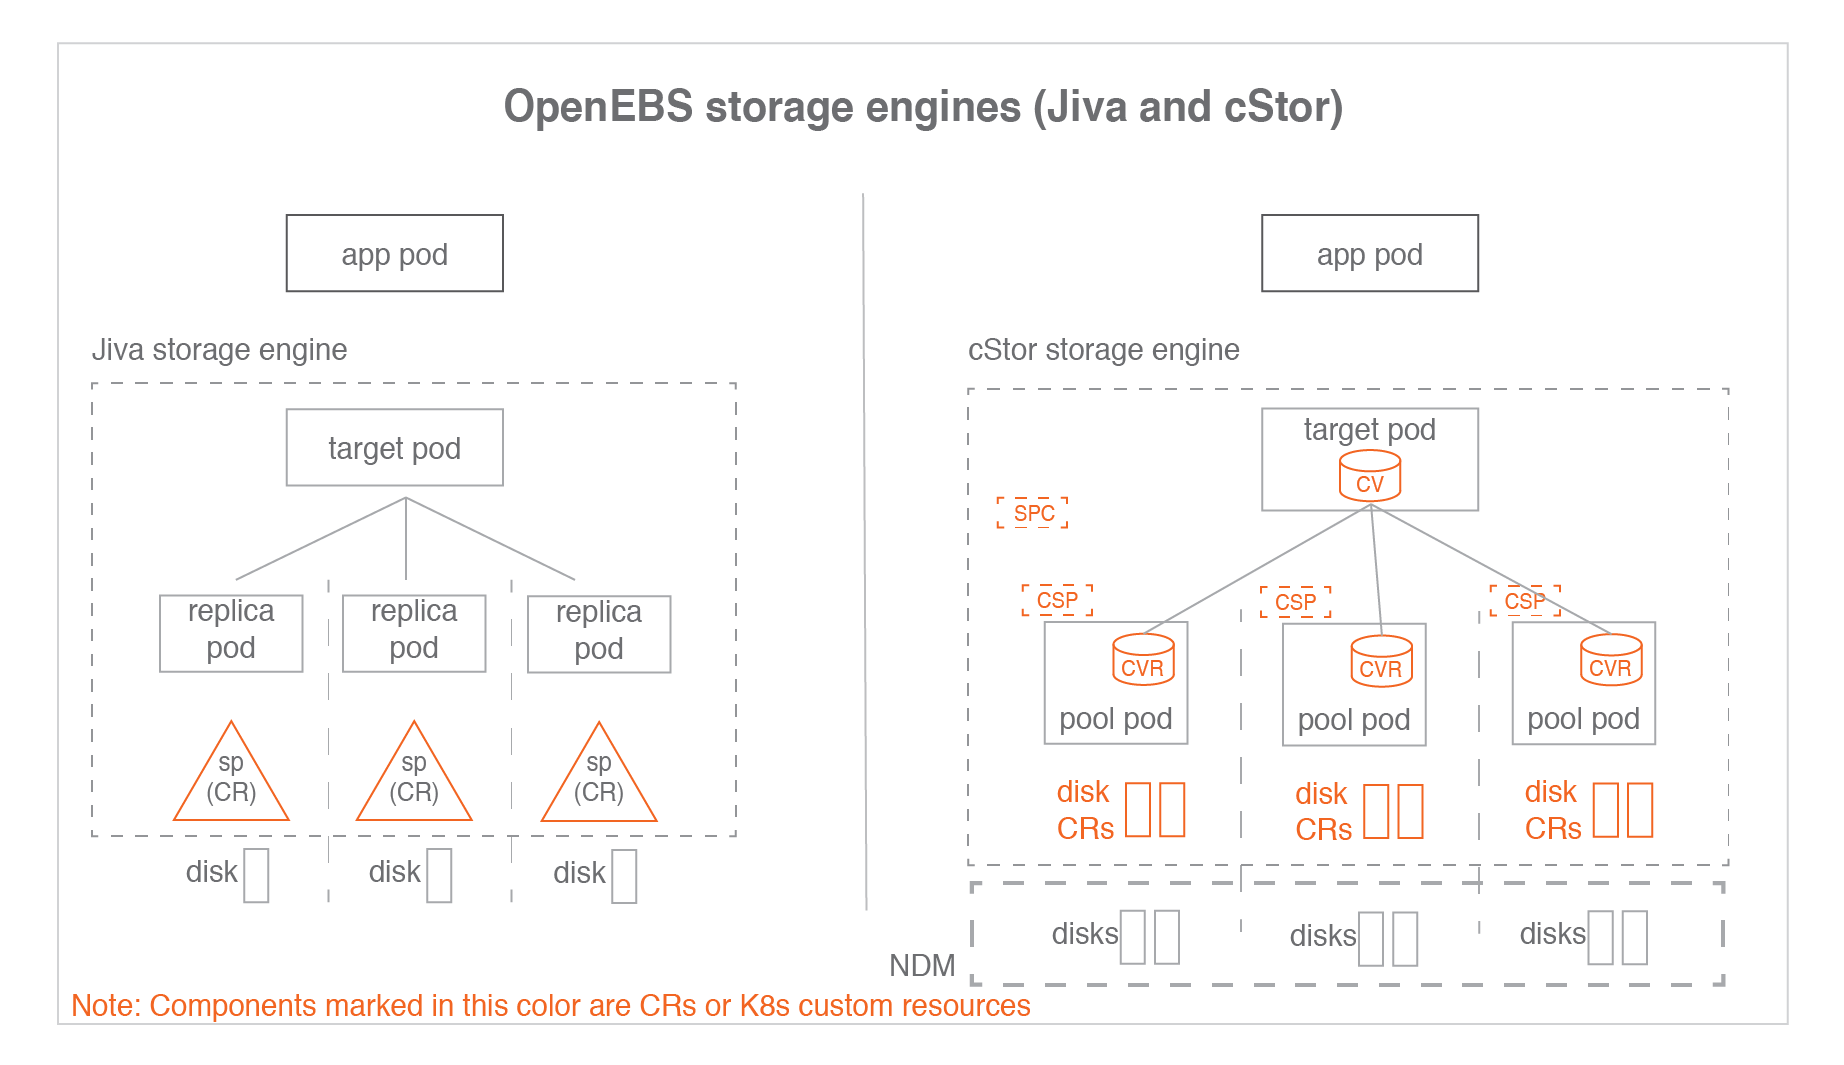
There are three kinds of CAS engines: Jiva cStor LocalPV
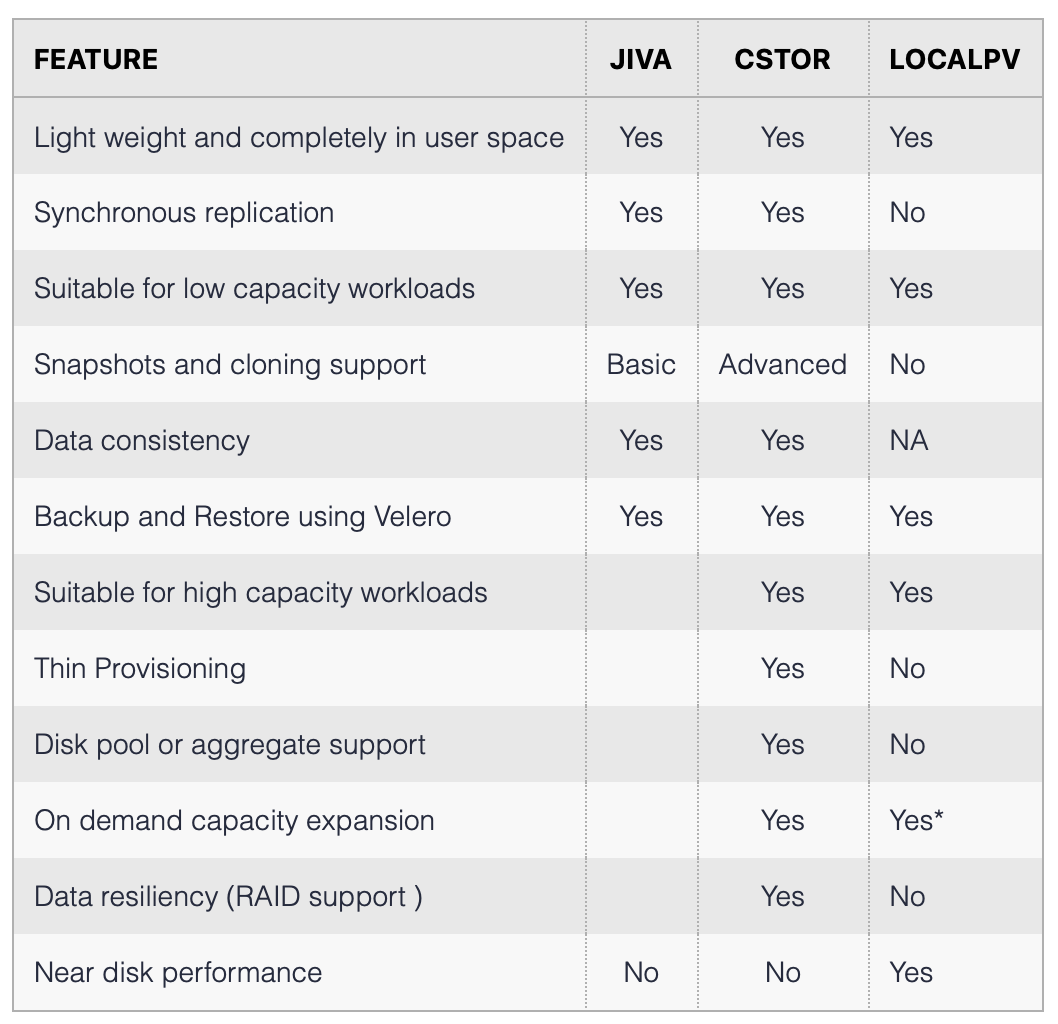
We mainly distinguish between Jiva and cStor, they both have the function of replication, but Jiva is more lightweight, Jiva does not have such an abstraction layer as Disk Pool>, so the replica copy and data operations are done through Replica Pod, all in performance will be better than cStor, and then look at cStor, it uses the mechanism of Disk Pool is a mechanism that adds abstraction layers like cStor Storage Pool, Storage Pool Claim, and we will discuss cStor specifically below.
Comparison of storage engine features
cStor Engine
cStor is the most widely used storage engine for OpenEBS because it has withstood the test of use in production environments. Jiva is the Longhorn backend engine because it is adopted > and Longhorn is still an incubation project, you can use Jiva in test and development environments, > and try to use cStor in production environments.
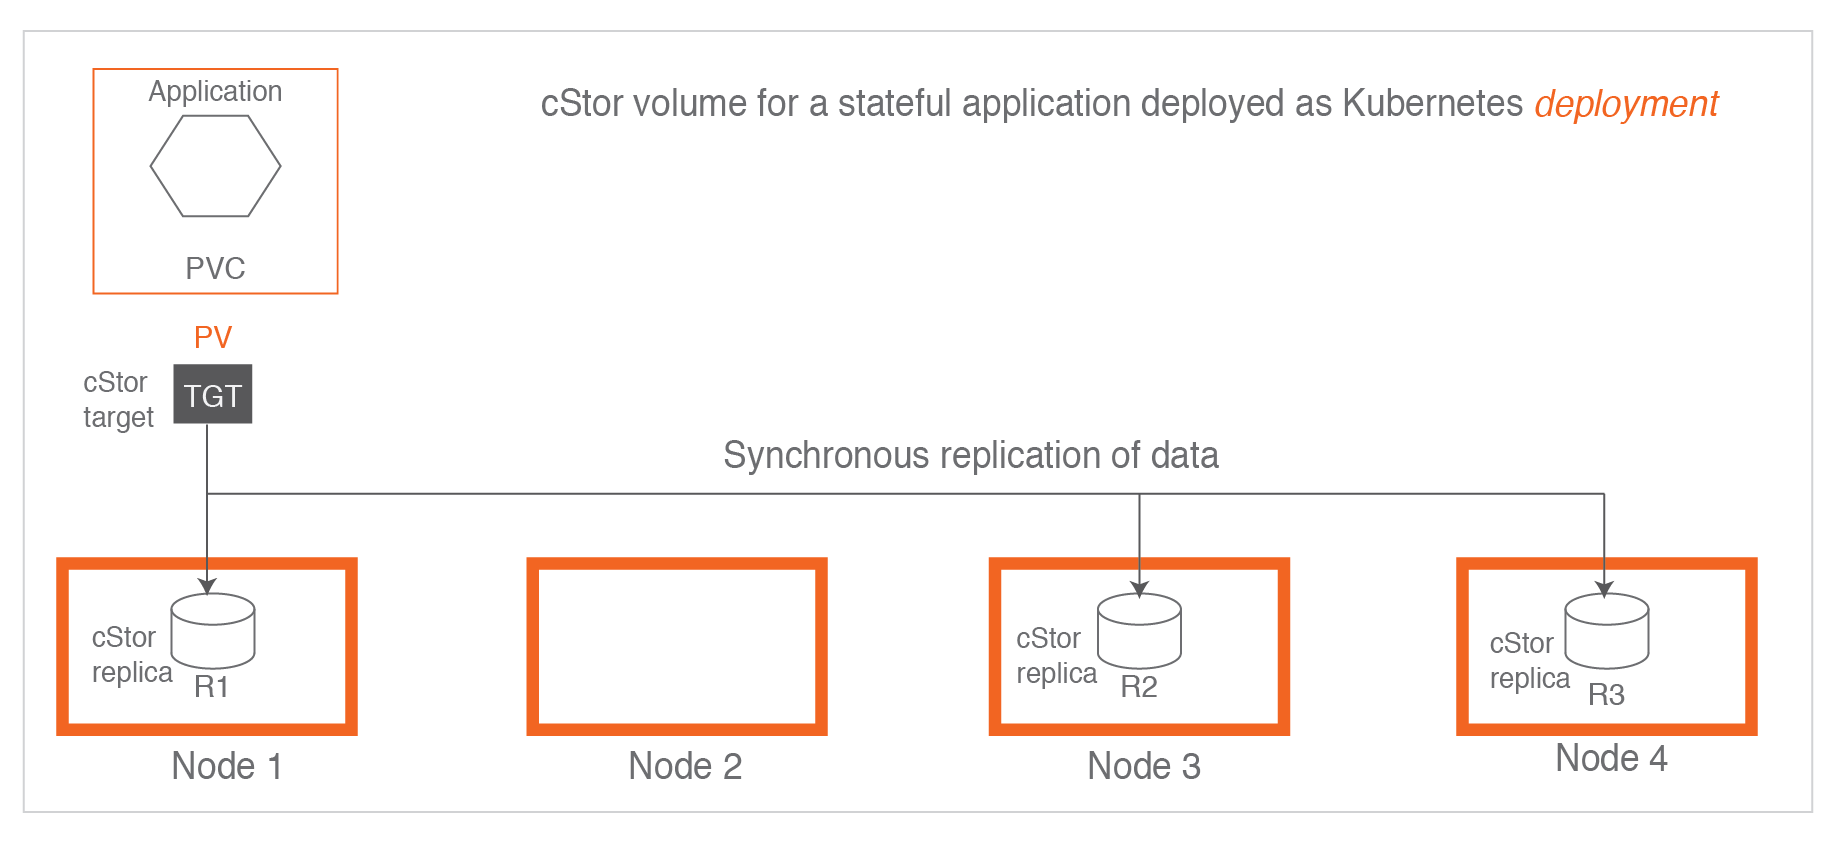
When using cStor in Kubernets, we can see that the data on the Application Pod is copied in multiple copies to different data nodes. All the data copied to the node is a complete copy.
Here we need to introduce two main modules, which are cStor Target and cStor Pool in the figure, corresponding to similar Pods> as pvc-223d971c-cd6a-4584-b5c3-bc501594d85b-target-5db799684cws2bz and cstor-disk-pool-7prl-5c896fc5f8-7n68l respectively.
-
cStor Pool: Maintains data on storage, persists on nodes, maintains a copy of each volume, manages snapshots and clones > copies. Similar to the concept of LVM, creating a cStor Pool requires creating a Storage Pool first.
-
cStor Target: When the PVC volumes are created, cStor Target Pods are created and they provide iSCSI data storage, Application will request data from cStor Target Pods through iSCSI service, and cStor Target will send the data to cStor Pool.
For each PVC created we can see a similar kube service being created:
apiVersion: v1
kind: Service
metadata:
  annotations:
    openebs.io/storage-class-ref: |
      name: openebs-cstor-disk-pool
  labels:
    openebs.io/cas-template-name: cstor-volume-create-default-2.1.0
    openebs.io/cas-type: cstor
    openebs.io/persistent-volume: pvc-a3ef1f31-04c6-47e8-811c-40fba7a02a42
    openebs.io/persistent-volume-claim: polkadot-node-database-polkadot-node-0
    openebs.io/storage-engine-type: cstor
    openebs.io/target-service: cstor-target-svc
    openebs.io/version: 2.2.0
spec:
  clusterIP: 10.111.0.196
  ports:
  - name: cstor-iscsi
    port: 3260
    protocol: TCP
    targetPort: 3260
  - name: cstor-grpc
    port: 7777
    protocol: TCP
    targetPort: 7777
  - name: mgmt
    port: 6060
    protocol: TCP
    targetPort: 6060
  - name: exporter
    port: 9500
    protocol: TCP
    targetPort: 9500
  selector:
    app: cstor-volume-manager
    openebs.io/persistent-volume: pvc-a3ef1f31-04c6-47e8-811c-40fba7a02a42
    openebs.io/target: cstor-target
  sessionAffinity: None
  type: ClusterIP
We can see that the port corresponding to cstor-iscsi will be mapped to openebs.io/target: cstor-target
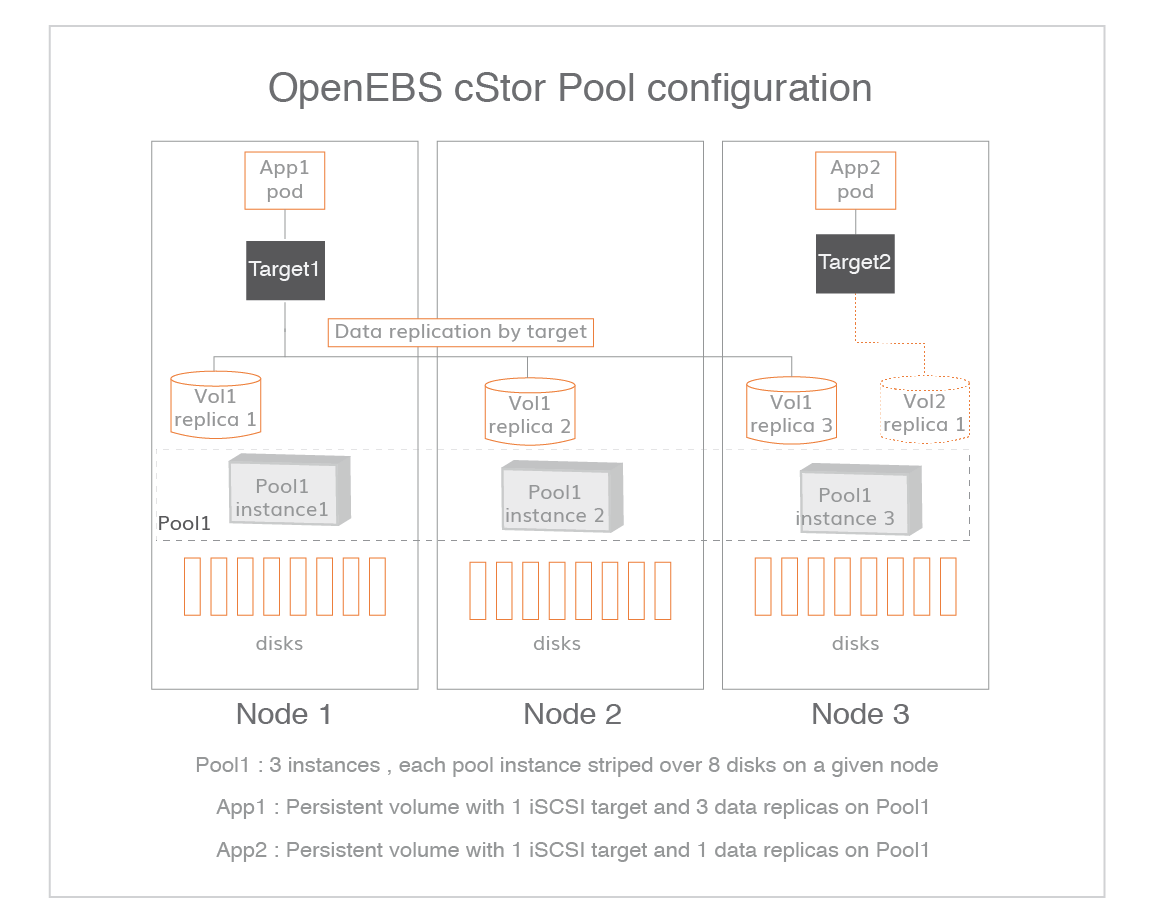
Here we need to explain a key point, all copies copy all occur in the volume level, that is, cstor-target, including data reconstruction is also occurred > in the target layer, we can look at the above figure, which defines two Target, respectively, Target1 and Target2, Target1 will copy three, Target1 will copy three copies to Pool1, while Target2 will copy only one copy to Pool1 (only one copy of the original data).
Install
Modify the docker image in the yaml file according to the requirements, because I am using the arm64 architecture, so the images are all arm64.
Deploy the application:
kubectl apply -f openebs-operator-custom.yaml
Get block device info:
kubectl get blockdevice -n openebs
apiVersion: openebs.io/v1alpha1
kind: StoragePoolClaim
metadata:
  namespace: openebs
  name: cstor-disk-pool
  annotations:
    cas.openebs.io/config: |
      - name: PoolResourceRequests
        value: |-
            memory: 1Gi
      - name: PoolResourceLimits
        value: |-
            memory: 5Gi
spec:
  name: cstor-disk-pool
  type: disk
  poolSpec:
    poolType: striped
  blockDevices:
    blockDeviceList:
    - blockdevice-4e46911e784fa99e62b48fa6e03375df
    - blockdevice-78e8ee08a23ed4363f34ca699ad5666e
    - blockdevice-da35a8151b969f3822effcf3fdc8cc13
Create cstor-disk-pool as required
Finally, create the Storage Class
apiVersion: storage.k8s.io/v1
kind: StorageClass
metadata:
  name: openebs-cstor-disk-pool
  annotations:
    openebs.io/cas-type: cstor
    cas.openebs.io/config: |
      - name: StoragePoolClaim
        value: "cstor-disk-pool"
      - name: ReplicaCount
        value: "3"
provisioner: openebs.io/provisioner-iscsi
Finally make sure all OpenEBS Pods are up and running so you can start using the openebs-cstor-disk-pool PVC in Pods creation.
Upgrade
Use the official upgrade manual Upgrade OpenEBS to upgrade, currently it works in your own test, for example from 2.1.0 to 2.2.0.
Trouble Shooting ## 1.
- If cStorPool encounters an error like ERROR Failed to connect to 10.x.x.x, it means that the PVC is not cleared > cleanly.
shell login to cstor-disk-pool, execute zfs get io.openebs:targetip, check if there is 10.x.x.x above, if there is, we can list the PVC zfs list, then delete the corresponding pvc zfs destroy $pvc
- If cStorPool encounters zpool list: no such pool and looks in cstor-pool
the error is:
pool_state=0x0 pool_context=0x2 pool_failmode="wait" vdev_guid=0xb1670e3a8363ea11 vdev_type="disk
We can login to cstor-disk-pool and use zpool import -F cstor-dee8315a-a61f-492c-8f21-96e608fe5c02 to solve the problem, specifically -F cstor-dee8315a-a61f-492c-8f21- 96e608fe5c02 according to your actual environment to fill in.
The following error occurs in openebs cstor and output in cstor-pool log ERROR fail on already available snapshot pvc-6da87e1d-1528-4c9b-b78f-eae6e97f1d80@rebuild_snap, the following method is for openebs cspc version.
ereport.fs.zfs.checksum ena=0x604aaa86feffc01 detector=[ version=0x0 scheme=
 "zfs" pool=0x1080d831c2f79f6d vdev=0x8521415e00a48561 ] pool=
 "cstor-4bd062aa-abe6-4383-8dfc-c06ca3aaf9e3" pool_guid=0x1080d831c2f79f6d
 pool_state=0x0 pool_context=0x0 pool_failmode="wait" vdev_guid=
 0x8521415e00a48561 vdev_type="disk" vdev_path="/dev/sda1" vdev_ashift=0x9
 vdev_complete_ts=0x604aa9debc vdev_delta_ts=0xee4c063 vdev_read_errors=0x0
 vdev_write_errors=0x0 vdev_cksum_errors=0x0 parent_guid=0x1080d831c2f79f6d
 parent_type="root" vdev_spare_paths=[...] vdev_spare_guids=[ ] zio_err=0x34
 zio_flags=0x180880 zio_stage=0x400000 zio_pipeline=0xf80000 zio_delay=
 0xee4af9b zio_timestamp=0x603bc51e59 zio_delta=0xee4c007 zio_offset=
 0xb66bc1b800 zio_size=0x200 zio_objset=0x1d2 zio_object=0x3 zio_level=0x0
 zio_blkid=0x29c cksum_expected=[ 0xdee3d00b9 0x47359dd3651 0xcc306ebdcfad
 0x1a924b3b71b5fd ] cksum_actual=[ 0x3d2d239389 0xfd293e09abf 0x2c631c30b7653
 0x5db85ed39028f3 ] cksum_algorithm="fletcher4" time=[ 0x61a020d4 0x0 ] eid=0x4
``**

Solution ideas:

    1. Find out which volumes are hosted on the failed cstor pool disk node.

    2. Edit the cstor volume configuration: kubectl edit cstorvolumeconfigs.cstor.openebs.io -n openebs pvc-5ec38555-b11f-462e-ad8a-67d7dac52edb
       Remove the pool where replicaPoolInfo contains the corrupt pool
       replicaPoolInfo:
       - poolName: cstor-disk-pool-cfc9
       - poolName: cstor-disk-pool-dqv7
       - poolName: cstor-disk-pool-p4jr (delete**)

    3. iterate through all cstor volumes and repeat operation step 2.

    4. finally delete the corrupt pool node in cspc, kubectl edit cspc -n openebs cstor-disk-pool, the pool node will be deleted.

    5. rebuild the cstor pool node, kubectl edit cspc -n openebs cstor-disk-pool rejoin the pool node configuration.

    6. kubectl get cstorpoolinstances.cstor.openebs.io -A Find the name of the rebuilt pool node instance, such as cstor-disk-pool-p4jr.

    7. Iterate through the above modified cstor volume configuration and add - poolName: cstor-disk-pool-p4jr to the replicaPoolInfo option.

    8. Wait for the pool node instance node to complete data synchronization.


4.

    openebs cstor error 11 listsnap

    Solution, find out which PVCs have error 11 listsnap, delete the PVC pods, for example, kubectl delete pods -n openebs pvc-033c9690-da5c-4363-a31a-97a563c4b48f-target-788b64454ccll7z


